This tutorial was written on June 3, 2011, Shani aka Wicked Princess. The concept of the tag is mine and mine alone. Any resemblance to any other tag/tut is pure coincidence. This was written for those with working knowledge of Paint Shop Pro.
Supplies Needed:
++Paint Shop Pro ( I used 10 but any version should work)
++Two tubes of choice or the ones I used. I used the work of Zlata_M and you can purchase her work from
PicsForDesign Specifically I used “dancing” this comes in many layers. So I just changed the color hat and dress layers.
++Texture of your choice. I used one from Toxic Desirez which you can find on her
Blog
++The Checkerboard shape that I have included and you can download it
here++Fonts of your choice. I used vrinda which should be a default font for PSP. The other one I used for my name is Weltron and I can’t remember where I found it lol
No plug ins needed!!! This is a no scraps, no plug in tutorial for a banner and avatar! First the banner…I will try to keep it simple for you.
**NOTE ADD DROP SHADOWS OF YOUR CHOOSING AS YOU LIKE! AND SAVE AS YOU GO!
Open a new canvas 600x250 with a transparent background. Open your texture of choice, for this one I used texture 4. Minimize the texture. In your materials palette click on the foreground box. Change it to pattern then click on the drop down menu. Scroll down until you see your texture, and click on it. Set the scale to 50 and click ok. Now using your flood fill tool, flood the canvas. You now should see a brightly colored canvas!
Next you will want to open your checkerboard shape then copy and paste as a new layer in your canvas. You may need to adjust it a bit. Now the fun parts!
Open your first tube of choice. Resize it as you want it, I reduced mine about 40 percent I believe. Copy and paste it as a new layer above the checkerboard. Move it to the left edge to wear most of the black behind it is covered. Duplicate it then go to adjust, blur, gaussian blur and set it to 3.00. On that same layer, go to the layers mode and set it to overlay. Go to layers, merge down one layer. Duplicate it and go to image, mirror. Adjust it if you need to. Want more fun? Continue this process to cover the entire checkerboard! Move the tube up to show different parts, down, opposite, whatever you like. I just went with whatever I thought looked the best. The key though is to make sure that you do not see any black behind the tubes. Now close off the other layers EXCEPT your tubes. Go to layers, merge visible. Duplicate this layer, and on the bottom layer we’re going to add a bit of texture! Go to Effects, texture effects, mosaic antique. I kept my settings at 50 for number of columns and rows, then tile diffusion at 70%, grout width 5 and then grout diffusion at 50. You can always mess with the settings to make it as you want it! Click ok. On the top tube layer change the opacity to around 60 to 70%. This gives it a pretty cool “rough” look right? Merge this layer down one just like you merged before.
Go back down to the checkerboard, and go to selections, select all, selections float, selections defloat. What that does in case you didn’t know is makes sure that the edges aren’t rough when you fill or add something. Now go to the tube layer (yes while the checkerboard has the dancing ants) go to selections, invert. On your tubes layer, hit the delete key. Ta da! Look at that! Lol Go to selections none.
On the checkerboard layer again, the selections, select all, float, defloat again. Go to selections modify, expand by 3. Add a new layer and move it below the tubes layer. Flood fill it with your choice of color. I used a dark purple to match the texture and tube. Go to selections, none. On that layer go to adjust, blur, guassian blur again and at the same setting. See how it gives you a bit of a glow just like if you had used a gradient glow? Pretty cool huh?! You can now delete the original checkerboard layer.
Now open your other tube. Copy and paste as a new layer, resize it down. As you can see I just used the face portion of the girl. Move your tube to the open square on the center left. Use your magic wand tool and go to the checkerboard tube layer and click inside the square and go to selection, modify, expand by I think I did 10. Basically once you hit ok you want to see the dancing ants get bigger so that they are beyond your current square. Go back to the tube layer, go to selections, invert. Hit the delete key then selections none. Repeat this for the next open space over. Merge down one layer and then move this below the blurred checkerboard, the one we made into our “glow”.
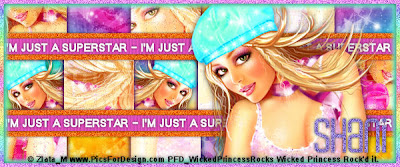
We’re going to do our rectangles now. Using your preset shape tool, activate the rectangle tool. In the layers palette, choose the foreground and background colors to ones that will compliment your tube. Draw out a medium sized rectangle. I guess you could say the thickness of a common ribbon. I over drew mine just a little, to make sure I had it long enough. Don’t worry about placement; we’ll move it in a minute after another few steps. Convert this to a raster layer. To do this you would right click on it in the layers palette, and in the menu click on convert to raster layer. With this layer still activated go to selections, float, selections defloat then selections contract by 10. Add a new raster layer and flood fill this one with a another color that compliments the tube. Go to selections none. On the bottom rectangle, go to adjust, add noise. Play with the settings to what you like. On the top rectangle layer go to textures, texture effects, blinds and I used the settings Width 5, opacity 15, then the color to black, horizontal unchecked and light from left top checked. Click ok. Pretty cool effects huh? I added a drop shadow to the top rectangle to just give it a bit of depth. Merge down one layer. Now we’re going to move it! I moved it so the top edges of it was lined up with the edges of the middle squares. Look at mine to see what I mean. Duplicate it and go to image, flip. Adjust it a little bit if you need to. Activate your text tool, change the foreground and background colors to what you like, I chose white. You can type in whatever text you like, I used “I’m just a superstar” in all caps. I repeated it a few times to make sure I had enough room. Now move this to center it in the bottom rectangles. I added a drop shadow too. Adjust it to where you like it. Duplicate it and move it to the upper one too. It’s a pain in the bum, but take the time to really try to center it, it took me a few tries to get it to match.
Almost done! Add your tube, I moved mine to the left a bit, it’s just where I liked it. Add yours where ever you like it and have fun with it! Once you’ve got it where you like it, SAVE! But save it in layers so you can go back and change it anytime you want. Now that you’ve save and not scared you’ve done something you can’t change lol, merge visible. OMG scary huh? Now we’re going to add borders! Go to selections, select all then selections, float, selections defloat. Now go to selections, modify, select borders. Set it at 10, with anti-alias checked and inside checked. Click ok. Activate your flood fill tool, change the foreground and background to a color you like. I chose a lighter one. Add a new raster layer and then flood fill with that color. Go to selections none. Now go to adjust, blur, guassian blur again set at 3.00. Now back to your merged layer. Repeat the process again, but this time set to 5. Flood fill again with whatever color, I used a gradient. I added noise to it too.
Add your copyrights and license number and save as jpeg! Pretty swift huh?
Now on to the avatar…easy peasy I promise!
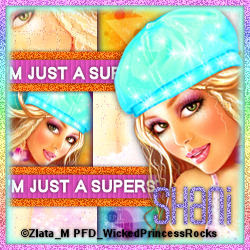
Open up your PSPimage of the banner we just did. Now open a new canvas of 250x250, yes I make my avatar’s larger than most. Back to your PSPimage banner, close off the tube layer and the rectangles and merge visible. Go to edit copy then over to your new canvas and do edit, paste. Move it around to where you kind of like it, I messed around with it for a few minutes until it looked good. Back to the banner, close off everything else then open up the rectangles and words, merge those down then copy. Back to the avatar, paste as a new layer and move it and adjust like you did before. Add your tube and place it where you want. Repeat the steps before for the border and add your copyright and license number! Save as a pspimage first then as a jpeg. Add your name and your done!
Pretty cool huh?


