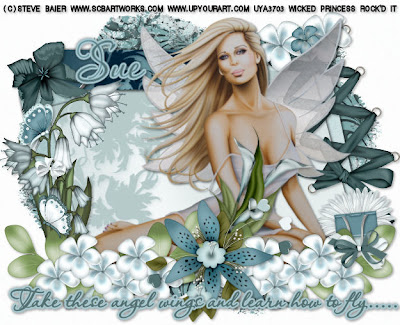
This tutorial was written on December 31, 2009 Shani aka Wicked Princess. The concept of the tag is mine and mine alone. Any resemblance to any other tag/tut is pure coincidence. This was written for those with working knowledge of PSP.
Supplies Needed:
++Paint Shop Pro ( I used 10 but any version should work)
++Scrap kit Icicle by Wacky Winnie Designs and can be purchased HERE
++Template 120 by Designs by Ali can be found HERE
++Tube of choice or the one I used. I used the artwork of Steve Baier which can be purchased from UYA You must have a valid license in order to use his work.
++++Font and Mask of your choice
**NOTES:
-Add Drop shadow of choice as you go
-You can merger layers as you want to make things easier for yourself.
Open the template in PSP, using your shortcut keys on your keyboard (SHIFT+D) duplicate the template as a new image. Close the original.
Open several papers of choice, resizing as needed. For example, when I look at the blue bar where it tells me what I’ve opened (say like paper 2) it tells me what percentage I’m viewing it at. For me it’s usually 16%, so I resize to 16% bringing it to 100%. ( I hope that made sense!) Once you’ve done this, minimize for later use.
Next go to the bottom template layer and go to selections, select all, then float, selections defloat. Don’t forget to go to selections, none then delete the template layer. Repeat this process for the rest of the template. ** Note I deleted the snowflakes layer.
Add a new raster layer and move it to the bottom of the layers palette. Flood fill with your choice of paper and add your mask. Merge the group.
Open your flower of choice (I think they are blue bells?) and resize. Copy and paste as a new layer towards the bottom right hand corner of the tag. Add another one mirrored the other way, as a new layer right below it.
Then open the lace up with eyelets, resize it then copy and paste as a new layer. Move it to the right side of the template layers, and angle it so its half on the template and half off.
Next open the painted flower you like, copy and paste as a new layer to the upper left corner of the template squares.
Now open the two hibiscus flowers you like. Copy and paste the one after resizing and move it to the upper right hand corner of the template. Duplicate it and move it over slightly, and add the second one after resizing to the center of that.
Open the flower with clip, resize it then copy and paste as a new layer towards the bottom of the lace up. Arrange it how you like.
Then open your tube of choice, resize then copy and paste into the center of your canvas. Arrange it how you want it.
This next step is optional, I chose to put the calla lily cluster set over the tubes chest area, to hide the adult content part. You can leave that out if you like.
Open the hibiscus flower bunch you like, resize then copy and paste as a new layer to the left of the canvas on the bottom. Duplicate it and go to image, mirror. Arrange as you like. Add the tigerlily cluster you like to the center where the two meet.
Open the bow you like, resize it then copy and paste as a new layer to the right where the flower clip is.
Add a bow to the blue bell’s to the left. Also add two butterflies where you like them.
Now add your text, copyrights, license info and tagger markings. Save and your done!
Thanks for trying my tutorial.

No comments:
Post a Comment