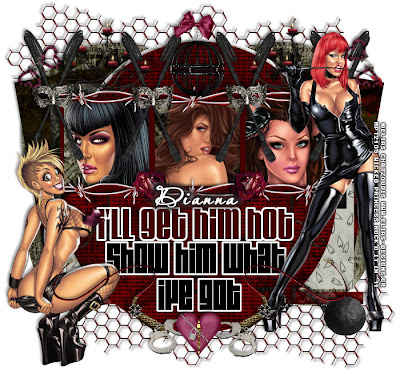
This tutorial was written on February 5, 2011 Shani aka Wicked Princess. The concept of the tag is mine and mine alone. Any resemblance to any other tag/tut is pure coincidence. This was written for those with working knowledge of PSP.
Supplies Needed:
++Paint Shop Pro ( I used 10 but any version should work)
++Scrap kit Dark Cravings 2 by Dianna of Digicat’s (and dogs) HERE
++ 5 tube of choice. I used the artwork of Elias Chatzoudis you can purchase his work from HERE
++Template 382 by Missy can be found HERE
++Font of choice
**NOTES:
-Add Drop shadow of choice as you go
-You can merger layers as you want to make things easier for yourself.
Open several papers of choice, resizing as needed. For example, when I look at the blue bar where it tells me what I’ve opened (say like paper 2) it tells me what percentage I’m viewing it at. For me it’s usually 16%, so I resize to 16% bringing it to 100%. ( I hope that made sense!) Once you’ve done this, minimize for later use.
Next go to the bottom template layer and go to selections, select all, then float, selections defloat. Don’t forget to go to selections; none then delete the template layer. Repeat this process for the rest of the template. Note I removed the dot layers…
Add a new raster layer and move it to the bottom. Open the metal chain fencing. Resize if you like, copy and paste as a new layer. Move it to the upper left hand corner of the canvas. Duplicate it and go to image, mirror then image, flip.
Next open the candelabra you like. Resize it then copy and paste as a new layer. Move it down below the word art layer. Move it to the left and adjust as you like. Duplicate it and go to image, mirror.
Open the first three tubes you want to use. Copy and paste your first tube, positioning it where you like in the first frame, but below the frame. Using your magic wand tool, click inside the frame on the left. Go to selections, modify, contract by 4. Go to selections, invert. On the tube layer, hit the delete key. Go to selections, none. Do this for the other three frames as well.
Now open the barbed wire, resize then copy and paste as a new layer. Move it above the frame layer, at the top of it. Duplicate it and then move one to the bottom frames. Add a rose to either side of the middle frame.
Then open the wand (they’re in an X) copy and paste as a new layer. Move to the right side of the frame, at the end of the barbed wire. Duplicate it then move to the in between of the frames. Add the silver mask to the center of each of those. Add a set of fuzzy cuffs to the top left side of the wands. Duplicate it and go to image, mirror.
Next open your one tube of choice. Resize then copy and paste as a new layer. Move to the bottom left side of the tag.
Open the other tube. Copy and paste as a new layer and move to the right side of the tag. Add the ball and chain to the bottom of the foot. Erase the parts where it would look like it was around the foot.
Now open the whip you like, resize then copy and paste as a new layer. Move to the left side of the tag on the bottom. Duplicate it and go to image, mirror. Add the regular handcuffs you like to the bottom left and right of those. Along with the heart of your choosing to the center.
Then open the ball cage, resize then copy and paste as a new layer. Move it to the top of it. Add a bow to the top the chain.
Finally add your text, copyrights and license number. Save and you’re done! Thank you for trying my tutorial.
