Wednesday, July 21, 2010

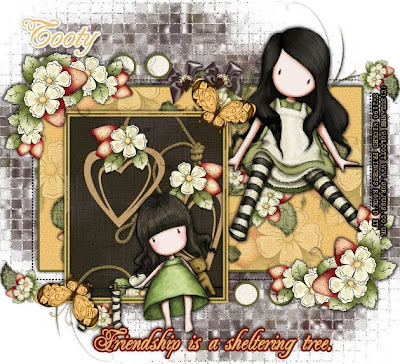
Friendship Tree PTU


This tutorial was written on July 21, 2010 Shani aka Wicked Princess. The concept of the tag is mine and mine alone. Any resemblance to any other tag/tut is pure coincidence. This was written for those with working knowledge of PSP.

Supplies Needed:

++Paint Shop Pro ( I used 10 but any version should work)

++Scrap kit by Tootypup Scraps called A Care Bear For You and can be purchased at any of the stores listed on her blog HERE

++Template 159 by Ali at HERE

++Tube of choice or the one I used. I used the artwork of Suzanne Wolcott and you can purchase her work from HERE


++Font and mask of choice


**NOTES:
-Add Drop shadow of choice as you go
-You can merger layers as you want to make things easier for yourself.

Open the template in PSP, using your shortcut keys on your keyboard (SHIFT+D) duplicate the template as a new image. Close the original.

Open several papers of choice, resizing as needed. For example, when I look at the blue bar where it tells me what I’ve opened (say like paper 2) it tells me what percentage I’m viewing it at. For me it’s usually 16%, so I resize to 16% bringing it to 100%. ( I hope that made sense!) Once you’ve done this, minimize for later use.

Next go to the bottom template layer and go to selections, select all, then float, selections defloat. Don’t forget to go to selections, none then delete the template layer. Repeat this process for the rest of the template. Add a gradient glow also of your choosing to each template layer.

Add a new raster layer and flood fill with your choice of paper. Add your mask of choice. Merge the group.

First open the vined flower you like. Resize then copy and paste as a new layer. Move it to above the large rectangle layer. Duplicate it and then go to image, mirror then image flip.

Then open your first tube, resize then copy and paste as a new layer to the upper right of the rectangle. Adjust as needed. Erase parts you don’t want seen outside of the rectangle.

Now open the heart cluster you like with the flowers. Center in the frame, but below the frame. Using your magic wand tool and click inside the frame. Go to selections, modify, expand it by 3. Go to selections, invert. On the heart layer, hit the delete key. Go to selections, none.

Now open the other tube of choice, resize it then copy and paste as layer over the frame layer. Adjust and arrange as you like it.

Next open the butterfly of your choosing, resize it then copy and paste as a new layer. Move it at an angle to the upper right hand corner of the frame. Duplicate it and go to image, mirror then image, flip. Move it to the bottom left hand corner.

Then open the flower cluster you like then resize it. Copy and paste it as a new layer to the upper left hand corner of the rectangle. Duplicate it and go to image, mirror then image flip. Move to the bottom right hand corner of the rectangle layer. Add a bow of choice to the center of the rectangle at the top.

Finally add your copyrights, license info and tagger markings

Save and your done! Thanks for trying my tutorial.

Sunday, July 11, 2010

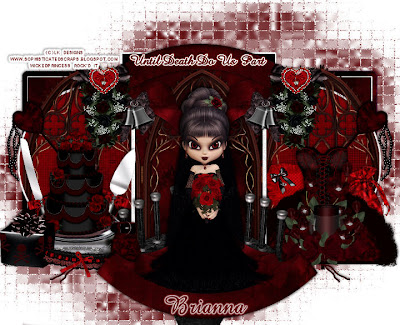
Till Death Do Us Part PTU


This tutorial was written on July 11, 2010 Shani aka Wicked Princess. The concept of the tag is mine and mine alone. Any resemblance to any other tag/tut is pure coincidence. This was written for those with working knowledge of PSP.

Supplies Needed:

++Paint Shop Pro ( I used 10 but any version should work)

++Scrap kit by called Dark Wedding by Gothic Witch Creations can be purchased from any of her stores on her blog HERE

++Template 331 by Missy can be found HERE

++Tube of choice or the one I used. I used the artwork of Lisa at Sophisticated imaging. The tube is included in the kit.

++Font and mask of choice


**NOTES:
-Add Drop shadow of choice as you go
-You can merger layers as you want to make things easier for yourself.

Open the template in PSP, using your shortcut keys on your keyboard (SHIFT+D) duplicate the template as a new image. Close the original.

Open several papers of choice, resizing as needed. For example, when I look at the blue bar where it tells me what I’ve opened (say like paper 2) it tells me what percentage I’m viewing it at. For me it’s usually 16%, so I resize to 16% bringing it to 100%. ( I hope that made sense!) Once you’ve done this, minimize for later use.

Next go to the bottom template layer and go to selections, select all, then float, selections defloat. Don’t forget to go to selections, none then delete the template layer. Repeat this process for the rest of the template.

Add a new raster layer and flood fill with your choice of paper. Add your mask, merge the group.

Open the windows, resize then copy and paste as a new layer. Duplicate it and move it below the center rectangle. On the double circle layer, go to selections, float, selections defloat, then selections, invert. On the gate layer, hit the delete key. Go to selections, none. On the top gate layer, erase the parts you don’t want seen outside of the circles.

Next open the heart pin with beads. Resize then copy and paste as a new layer to the left and at an angle. You want to move it just above the middle of the circle.

Then open the fan of your choosing, resize then copy and paste as a new layer to the left of the canvas. And also place at the bottom of the left rectangle. Duplicate it and go to image, mirror.

On the right side fan, copy and paste the corset of your choosing and then thesash bag and pillow you like . Place the pillow and sash bag on either side. Add the candle with flowers, centered in front of the fan.

Now open the wedding cake, resize it then copy and paste as a new layer in front of the fan on the left. Resize as needed. Add the knife and cake spatula behind it at an angle. Then add the present, garter and booth you like in front oof the cake.

Open the stage, resize it then copy and paste as a new layer. Move to the center of the tag, towards the bottom.

Next open the banner, resize then copy and paste as a new layer. Move to the top of the rectangle. Duplicate it and go to image, flip.

Now open the rose bouquet, resize then copy and paste as a new layer just to the left of the banner at the top. Duplicate it and go to image, mirror. Add the heart pillow to the top of both of those. Then add the bell with ribbon you like.

Finally add your tube of choice to the center of the canvas.

Add your text, copyrights, tagger markings and license number if needed.

Save and your done.

Thanks for trying my tutorial.

Sunday, July 4, 2010

Natural Beauty PTU


This tutorial was written on July 4, 2010 Shani aka Wicked Princess. The concept of the tag is mine and mine alone. Any resemblance to any other tag/tut is pure coincidence. This was written for those with working knowledge of PSP.

Supplies Needed:

++Paint Shop Pro ( I used 10 but any version should work)

++Scrap kit by Nikki of Creative Intentionz called Oh So Natural can be purchased from HERE

++Template 333 By Missy can be found HERE

**NOTE: Scroll down on her blog and look on the left hand side to find the bundled template download links.


++ Tube of choice or the one I used. I used the work Jamie kidd which can be purchased from CILM

++Font and mask of choice

++Plug Ins:


-penta, dot and cross
-muera meister copies


**NOTES:
-Add Drop shadow of choice as you go
-You can merger layers as you want to make things easier for yourself.

Open the template in PSP, using your shortcut keys on your keyboard (SHIFT+D) duplicate the template as a new image. Close the original.

Go to image, canvas size, and change the canvas size to 800 by 650. This gives us more room to work with!

Open several papers of choice, resizing as needed. For example, when I look at the blue bar where it tells me what I’ve opened (say like paper 2) it tells me what percentage I’m viewing it at. For me it’s usually 16%, so I resize to 16% bringing it to 100%. ( I hope that made sense!) Once you’ve done this, minimize for later use.

Next go to the bottom template layer and go to selections, select all, then float, selections defloat. Don’t forget to go to selections, none then delete the template layer. Repeat this process for the rest of the template. **NOTE I deleted the word art.

Add a new raster layer and flood fill with your choice of paper. Send it to the bottom of the palette and add your mask of choice. Merge the group.

Open up the daisy flower you like, resize then copy and paste as a new layer. Use your plug in muera meister copies and set on encircle with shift x and y to 80. Which ever number on the flowers you like.

Then open your leaves on the vine. Resize then copy and paste as a new layer. Move to the left of the tag, and just above the bottom circle layer. Duplicate then go to image, mirror.

Now open the bow and ribbon you like. Resize then copy and paste as a new layer to the upper left, adjust as you need to. Duplicate it and go to image, mirror.

Next open your tube, resize it then copy and paste as a new layer. I used the close up tube that came in the pack I purchased. Move to above the small rectangle layer at the left. Resize and adjust where you like it. Duplicate, then go to adjust, blur by 3.00 then change the blend mode to overlay. Merge down one layer. Go to texture, blinds, and set to 2 and then to the opacity you like. Next add the plug in penta, on dot and cross. Whatever setting you would like. Duplicate it and go to image, mirror. On the rectangle layer go to selections, float, selections, defloat and then invert. Hit delete on the tube layers. Go to selection, none.

Open the fog element, resize then copy and paste as a new layer above the top circle layer. go to selections, float, selections, defloat and then invert. Hit delete on the fog layer.

Then open the folded paper hearts trails, resize then copy and paste as new layers. Move to the left of the circle. . go to selections, float, selections, defloat and then invert. Hit delete on the hearts layers.

Open your tube of choice again, resize then copy and paste as a new layer to the right of the circle. Duplicate it, we’re going to make it look like it’s popping out of the circle. On the circle layer go to selections, float, selections, defloat and then invert. Hit delete on the bottom tube layer. On the top tube layer, erase the parts on the bottom you don’t want seen outside of the circle. Add the bow of choice to the top of the circle, below the top tube layer.

Next open the rusty key, resize then copy and paste as a new layer. Move it to the bottom of the circles, angle it to the left. Duplicate it and go to image, mirror.

Now copy and paste the scroll beading, resize it then angle it to the left. Duplicate it and go to image, mirror. Add the cardboard heart of your choosing. Add a butterfly of your choosing where you like them.

Finally add your text, copyrights and tagger markings. Save and your done!

Thanks for trying my tutorial!

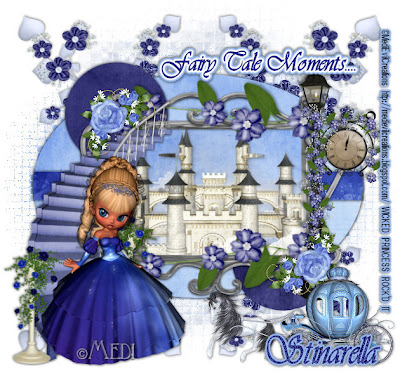
Fairytale Moments PTU


This tutorial was written on July 4th 2010 Shani aka Wicked Princess. The concept of the tag is mine and mine alone. Any resemblance to any other tag/tut is pure coincidence. This was written for those with working knowledge of PSP.

Supplies Needed:

++Paint Shop Pro ( I used 10 but any version should work)

++Scrap kit by Designs by Stina called Stinarella can be purchased at any of the stores listed on her blog.

++Template 250 By Missy can be found HERE

++Tube of choice or the one I used. I used the tube that was included in the kit. The tube is by Medi and you can look at her work further by going HERE

++Font and mask of choice


**NOTES:
-Add Drop shadow of choice as you go
-You can merger layers as you want to make things easier for yourself.

Open the template in PSP, using your shortcut keys on your keyboard (SHIFT+D) duplicate the template as a new image. Close the original.

Open several papers of choice, resizing as needed. For example, when I look at the blue bar where it tells me what I’ve opened (say like paper 2) it tells me what percentage I’m viewing it at. For me it’s usually 16%, so I resize to 16% bringing it to 100%. ( I hope that made sense!) Once you’ve done this, minimize for later use.

Next go to the bottom template layer and go to selections, select all, then float, selections defloat. Don’t forget to go to selections, none then delete the template layer. Repeat this process for the rest of the template.

Add a new raster layer and flood fill with your choice of paper. Use the mask of your choice and merge the group.

On the bottom template layer, duplicate it. Go to effects, texture effects, and then click on mosaic antique. Set to the settings you like. Merge down one.

Open the flower heart spray you like, resize then copy and paste as a new layer to the left corner, upper. Move it below the bottom template layer. Adjust where you are happy with it, then duplicate, image, mirror.

Below the frame layer, add the castle you like. Adjust it and move it where you like. Erase the parts you don’t want seen outside the frame.

Now open the silver scalloped frame, resize it then copy and paste as a new layer. Move it over the existing frame. Set it as you like it.

Then open the flower on the vine. Resize it then copy and paste as a new layer. Move it to the bottom of the frame. Duplicate it and go to image, flip.

Open the stair case of your choosing, resize it then copy and paste as a new layer. Move it to eh left, so it looks like its coming out of the top of the silver frame.

Next open the light pole with the clock. Resize it then copy and paste as a new layer.

Now open your tube of choice, resize then copy and paste as a new layer. Move to the bottom left of the tag. Just at the bottom of the stair case.

Then open the rose cluster, resize then copy and paste as a new layer. Move to the upper left of the silver frame. Duplicate it and go to image, mirror then image, flip. Move and adjust so that it’s in the bottom right corner of the silver.

Now add the carriage you like to the bottom right of the tag.

Add your text, copyrights and tagger markings. Save and your done!

Thanks for trying my tutorial.