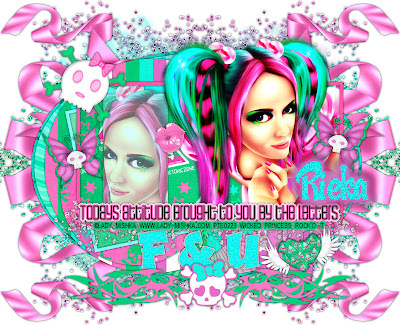
This tutorial was written on May 17, 2011 Shani aka Wicked Princess. The concept of the tag is mine and mine alone. Any resemblance to any other tag/tut is pure coincidence. This was written for those with working knowledge of http://www.blogger.com/img/blank.gifPSP.http://www.blogger.com/img/blank.gif
Supplies Needed:
++Paint Shop Pro ( I used 10 but any version should work)
++Scrap kit Toxic Candy by Rieka Rafita and you can find it here
http://www.blogger.com/img/blank.gif
++Template 95 by Creative by Nature HERE
++Tube of choice or the one I used the artwork of Lady Mishka and you can now find her work at Scraps and the City HERE
++Plug ins:
-penta.com-color dot
**NOTES:
-Add Drop shadow of choice as you go
-You can merger layers as you want to make things easier for yourself.
Open the template in PSP, using your shortcut keys on your keyboard (SHIFT+D) duplicate the template as a new image. Close the original.
Open several papers of choice, resizing as needed. For example, when I look at the blue bar where it tells me what I’ve opened (say like paper 2) it tells me what percentage I’m viewing it at. For me it’s usually 16%, so I resize to 16% bringing it to 100%. ( I hope that made sense!) Once you’ve done this, minimize for later use.
Next go to the bottom template layer and go to selections, select all, then float, selections defloat. Don’t forget to go to selections, none then delete the template layer. Repeat this process for the rest of the template.
Add a new raster layer and flood fill with your choice of paper. Add your mask of choice. Merge the group. Move to the bottom of the palette.
Open the glitter splatter of your choosing. Copy and paste as a new layer just above the mask layer. Move it to the upper right. Duplicate it and go to image, flip. Merge down one layer. Duplicate it again and go to image, mirror. Adjust as needed.
Next open the curly ribbon of your choice, resize then copy and paste as a new layer to the left of the canvas. Again, just above the glitter layer. Duplicate it and go to image, mirror.
On the right small rectangle, the faded one, change the opacity if you want to. I did and made it 100 percent. Open your tube and then copy and paste as a new layer. Adjust and move over the rectangle layer. Duplicate it then with the bottom layer active, go to adjust, blur, guassian blur, set it to 3.00. Then on the layers visibility, change it to overlay. Merge down one layer. Go to your plug in penta.com, color dots. Set it at your settings you like. Now go back to the rectangle layer and go to selections, float, selections, defloat , then selections invert. On the tube layer, hit delete. Then go to selections none. Change the visibility to 85.
Now copy and paste your tube again as a new layer. Duplicate it and with the bottom layer active go to adjust then guassian blur, set to 3.00. On the top layer set the layer to overlay. On the top set it where you like. Duplicate it and move one below the big rectangle layer. Using your magic wand tool, click inside the frame. Go to selections, invert and hit the delete key on the bottom tube layer. Go to selections none. Next go to the top layer, and remove the parts of the tube you don’t want seen outside the tube.
Open the flame and skull border. Resize it then copy and paste as a new layer. Move it to below the word art. Adjust as needed. Add the skull you like to the upper left of the canvas. Adjust as you like.
Next open the barbedwire heart…resize then copy and paste as a new layer. Move it to the bottom right of the canvas. Adjust as needed. Add the skull butterfly to the center left of the tag. Duplicate it and go to image, mirror. Add the lips to the left of the tube.
Finally add the copyrights, license information and your tagger markings. Thank you for trying my tutorial!
