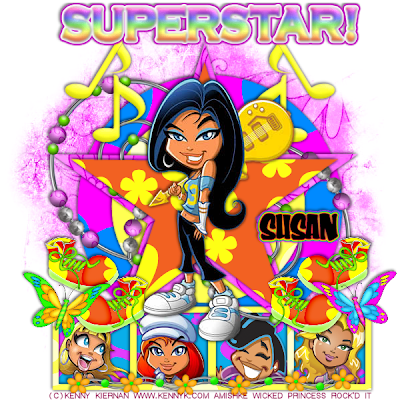
All my friends who know me well, know I love bright colors.. so I decided to steer from the rock themes this go around and make this fun one! I hope you like it! Please do send me your finished tags!
Groovy Superstar
This tutorial was written on March 31, 2009 By Shani aka Wicked Princess. The concept of the tag is my creation. Any similarities to any other tag is purely coincidental.
Supplies needed:
My template #2 which can be found on this blog
Scrap kit (FTU) A bit Groovy, which can be found here: http://scrapsdimensions-dorisnilsa.blogspot.com/2009/01/ftu-bit-groovy.html
Mask of choice
Gradient of choice
Eye Candy 4000 Gradient glow
5 tubes of choice, I used the artwork of Kenny Kiernan which you can find at www.artisticmindsinc.com You must have a valid license to use his work. Remember ALL of his work is now with AMI and is strictly PTU
Let’s get this tut a rockin!
Open the template and delete the copyright layer.
Open several papers of your choosing from the kit and minimize to be used later.
Add a blank raster layer at the very bottom of the template layers, flood fill with your choice of paper.
Add mask of choice, and merge group.
Select the first circle layer, and using your magic wand tool, click inside the circle. This will activate the dancing ants around it.
Go to selections, then float, the selections, defloat.
Add a new raster layer and flood fill with the paper of your choice.
Continue this for each part of the template.
For the music notes you can just choose a matching color if you like.
For the word art, I chose a rainbow gradient. I added a gradient glow on the fat setting choosing white and purple.
Next, open the four tubes of your choosing that will go between the frame layer and the rectangle layer. What I did before I copy and pasted the tubes, was use the selection tool (in the drop down menu from the magic wand tool) and used the square and just chose what part of the tube I wanted to use. When it was activated around that part I went to edit, cut and then pasted it into my working canvas. Move and adjust to where you want each one under the frame layer.
Open one of the beaded swirls of your choosing, copy and paste into your canvas. Adjust as needed, and move below the first star, so it is sandwiched between the two. Duplicate this layer and go to image, mirror.
Next add your shoes/boots of choice, adjust as needed and resize. Place to the left of the frame. Duplicate this layer and go to image, mirror.
Open the two butterflies of your choice and place them on either side of the frame.
Pick a metal flower piece and resize, copy and paste at the bottom of the frame.
Open your final tube, place it toward the center of the stars.
Add your copyright info, tagger stuff, and license info.
Add chosen text and save!
Ty for trying this fun and colorful tutorial!

No comments:
Post a Comment