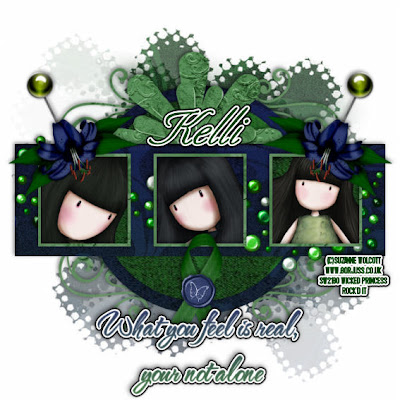
You are not alone
This tutorial was written on October 10, 2009 by Shani aka Wicked Princess. The concept of the tag is mine and mine alone. Any resemblance to any other tag/tut is pure coincidence. This was written for those with working knowledge of PSP.
Supplies Needed:
++Paint Shop Pro ( I used 10 but any version should work)
++Scrap kit by me called Coming Out of the Dark which is FTU can be found on my blog HERE
++Template 14 by Alyssa can be found HERE
++ 3 tubes of choice or the ones I used. I used the work of Suzanne Wolcott which you can be found HERE Note you must have a valid license in order to use her work.
++Font and Mask of choice
Let’s get Started!
**NOTES:
-Add Drop shadow of choice as you go
-You can merger layers as you want to make things easier for yourself.
Open the template in PSP, using your shortcut keys on your keyboard (SHIFT+D) duplicate the template as a new image. Close the original.
Open several papers of choice, resizing as needed. For example, when I look at the blue bar where it tells me what I’ve opened (say like paper 2) it tells me what percentage I’m viewing it at. For me it’s usually 16%, so I resize to 16% bringing it to 100%. ( I hope that made sense!) Once you’ve done this, minimize for later use.
Next go to the bottom template layer and go to selections, select all, then float, selections defloat. Add your gradient glow of choice. Don’t forget to go to selections, none then delete the template layer. Repeat this process for the rest of the template.
Add a new raster layer, flood fill with your choice of paper. Add your mask, and merge group. Move this layer to the bottom.
Then open the paper flower of choice, resize if needed. Copy and paste as a new layer and move below the rectangle layer. Adjust it so that its showing half way above the rectangle at the top of it.
Now open the green beading. Copy and paste as a new layer, move it to just above the rectangle layer. Adjust and resize as needed.
Open the pin of choice. Resize then copy and paste above the green beading layer. Move it so its sitting behind the framed square to the left. Duplicate it and go to image, mirror.
Next open your tubes of choice. Crop them as needed, then copy and paste your first one as a new layer. Move it below the framed layer on the left. Adjust as needed. Using your magic wand tool click inside the frame and go to selections, modify, expand by 3. Go to selections, invert. On the tube layer hit the delete key. Repeat this process for the other two frames and tubes.
Then open the tiger lily of your choice. Resize then copy and paste as a new layer. Angle it as you like and move it to the top of the frame layer on the left. Duplicate it and go to image, mirror.
Next open the awareness ribbon of your choice, resize then copy and paste as a new layer. Move it to the bottom, under the middle frame. Add a wax button of choice.
Add the word art of your choosing to the bottom of the tag.
Now add any other text, copyright info, license number and tagger markings.
Save and your done!
Thanks for trying my tutorial.

No comments:
Post a Comment