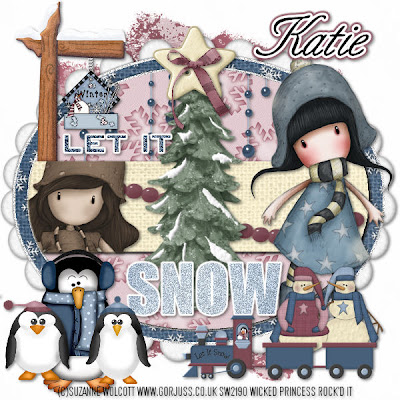
Let it Snow PTU
This tutorial was written on November 25, 2009hani aka Wicked Princess. The concept of the tag is mine and mine alone. Any resemblance to any other tag/tut is pure coincidence. This was written for those with working knowledge of PSP.
Supplies Needed:
++Paint Shop Pro ( I used 10 but any version should work)
++Scrap Kit by Crazed Creations called Snow Friends can be purchased HERE
++Template 2 by Tracy at Freebie Friends can be found HERE
++Two Tubes of choice, or the ones I used. I used the artwork of Suzanne Wolcott, which can be purchased HERE
++Plug ins:
-Meura Meister copies
++Font and mask of choice
**NOTES:
-Add Drop shadow of choice as you go
-You can merger layers as you want to make things easier for yourself.
Open the template in PSP, using your shortcut keys on your keyboard (SHIFT+D) duplicate the template as a new image. Close the original.
Open several papers of choice, resizing as needed. For example, when I look at the blue bar where it tells me what I’ve opened (say like paper 2) it tells me what percentage I’m viewing it at. For me it’s usually 16%, so I resize to 16% bringing it to 100%. ( I hope that made sense!) Once you’ve done this, minimize for later use.
Next go to the bottom template layer and go to selections, select all, then float, selections defloat. Don’t forget to go to selections, none then delete the template layer. Repeat this process for the rest of the template. **NOTE leave the glitter layers alone.
Add a new raster layer and move it to the bottom of the palette. Flood fill with your choice of paper. Add your mask and merge the group.
Open the snowball and resize it. Copy and paste as a new layer. Use your plug in Muera Meister Copies on the encircle option. Set your x at 90 and y at 70 with any number of snowballs you like!
Then open the dangle balls of your choice. Resize it then copy and paste as a new layer on the top oval layer. Erase the parts you don’t want seen outside the oval.
Add the winter sign of choice. Resize it and adjust as neede,d moving it to the upper left, below the rectangle layer. Have it sit just above the word art.
Next open the bead rope of your choice. Resize it then copy and paste as a new layer, across the rectangle layer. Erase the parts you don’t want seen outside the rectangle.
Now open the tree, resize in then copy and paste as a new layer just above the bead layer. Add a star button and bow respectfully at the top of the tree.
Open your first tube of choice, crop as needed. Copy and paste it as a new layer to the left of the rectangle layer. On the rectangle layer, go to selections, float then selections, defloat. Then selections, invert. Hit the delete key on that tube layer. Go to selections, none. Now change the color of the tube by going to effects, photo effects, sephia toning. Change it to the setting you like.
Then copy and paste the other tube after resizing to the right of the tag.
Next open the snowmen clipart of choice. Resize it then copy and paste as a new layer below the tube layer. Add the train to the bottom of the snowmen.
Open the three penguins, copy and paste after resizing to the left bottom of the tag, group them together.
Add any text you like, copyrights, license info and tagger markings.
Save and your done!
Thank you for trying my tutorial.

No comments:
Post a Comment