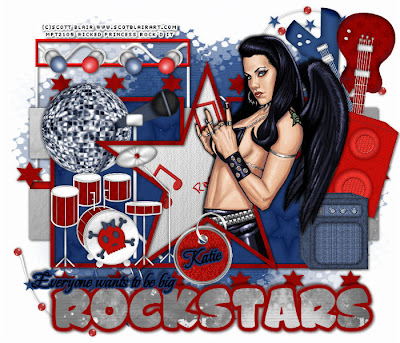
This tutorial was written on February 17, 2010 Shani aka Wicked Princess. The concept of the tag is mine and mine alone. Any resemblance to any other tag/tut is pure coincidence. This was written for those with working knowledge of PSP.
Supplies Needed:
++Paint Shop Pro ( I used 10 but any version should work)
++Scrap kit Rockstar by Crazed’s creations which can be purchased from HERE
++Template 132 by Ali can be found HERE
++Tube of choice or the one I used. I used the artwork of Scott Blair. His work can be purchased from HERE
++Font and mask of choice
**NOTES:
-Add Drop shadow of choice as you go
-You can merger layers as you want to make things easier for yourself.
Open the template in PSP, using your shortcut keys on your keyboard (SHIFT+D) duplicate the template as a new image. Close the original.
Open several papers of choice, resizing as needed. For example, when I look at the blue bar where it tells me what I’ve opened (say like paper 2) it tells me what percentage I’m viewing it at. For me it’s usually 16%, so I resize to 16% bringing it to 100%. ( I hope that made sense!) Once you’ve done this, minimize for later use.
Next go to the bottom template layer and go to selections, select all, then float, selections defloat. Don’t forget to go to selections, none then delete the template layer. Repeat this process for the rest of the template
Add a new raster layer and flood fill with your choice of paper. Add your mask of choice, merge group and move this layer to below the template layers.
Then open the stage, resize and copy and paste as a new layer towards the top of the canvas. Move below the bottom template layer.
Now open two of the guitars you like. Resize, copy and paste as new layers. Arrange them to the upper right of the canvas, angling as you like.
Next open the beaded twirl you like, resize then copy and paste as a new layer. Move to the bottom, just above the mask layer. You want it to be at the bottom left. Duplicate it and go to image, mirror then image, flip. Adjust as needed.
Now open the speaker and amp. Resize then copy and paste as a new layer to the right side of the canvas. Angle as you like and adjust.
Open the disco ball. Resize then copy and paste as a new layer to the upper left of the tag. Add the microphone to the center of the left hand rectangle.
Then open your tube of choice, resize then copy and paste as a new layer. Move it above the star frame layer. Duplicate it and move one layer below the frame. On the top tube layer, erase the parts of the tube you don’t want seen outside the frame. On the bottom layer erase the excess also.
Next open the drum set. Resize then copy and paste as a new layer. Move it to the left hand rectangle layer. Adjust as needed. Add the skull and crossbones to the center of the big drum. Angle it as you like.
Now open the tag you like, resize then copy and paste as a new layer. Make it look like its hooked around the star frame layer.
Add your text, copyrights, license info and tagger markings.
Save and your done!
Thanks for trying my tutorial.

No comments:
Post a Comment