*-*-NOTE! Mine has a gradient background only for the purpose of showing the dropshadow. Yours does not have to have it *-**-*
I was working on a tag earlier and decided to do something funky that I haven't done in a long time and made a sticker out of a name. A lot of people don't know how to do this, so I thought, what the heck? LOL In this tut you will learn how to make a sticker.
**This tutorial was created by me on 2/28/10 and the concept is my own. Any resmemblance to any other tutorial is by pure coincidence.
Let's get going!
No plug ins needed!
Open a new transparent canvas layer of 500x500, we can always crop when we're done.
Choose what ever font you like, personally I like script-fancy fonts lol. For this I used MeaCulpa with font size set at 24. Choose your color you want. I used a bright color to really show it off, but your welcome to use a gradient glow or even a pattern. Type out the name you want to use and click ok. Convert this layer to a raster layer then go to edit, cut then edit, paste as new layer. This centers it back in to the canvas evenly. It drives me nuts if it's not done this way lol.
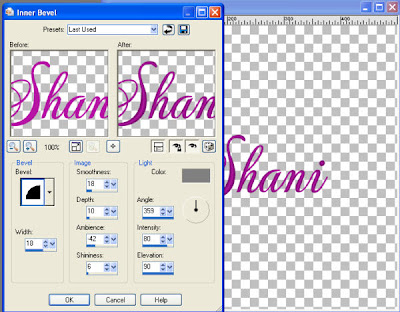
Next we're going to add an inner bevel. Go to effects, 3d effects, inner bevel. I used these settings:

I chose to keep the color setting on a gray, only because if I change it to white, it distorts the color. You can change it to whatever color you like.
Now go to selections, select all, then float, selections defloat. You should see dancing ants around the font. Go to selections, modify, expand by 4. This should give you a bit of a room around it to make it look like a decent sticker.
Add a new raster layer and move this below the font layer. Using your flood fill tool, flood fill with your choice of color. I chose white just as a default example. When satisfied, go to selections, none.
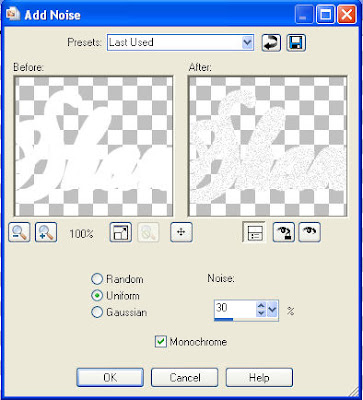
On the sticker layer, go to adjust, add/remove noise, add noise. These are the settings I used:

Now go back to the font layer, add a drop shadow you like. Make any adjustments you need to. If your satisfied with what you have done, crop and save it as a .png!
Thanks for trying my tutorial!
♥ Shani

No comments:
Post a Comment