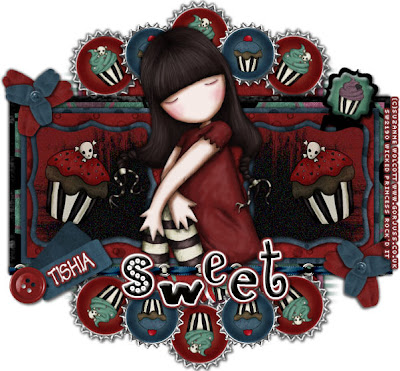
This tutorial was written on February 22, 2010 Shani aka Wicked Princess. The concept of the tag is mine and mine alone. Any resemblance to any other tag/tut is pure coincidence. This was written for those with working knowledge of PSP.
Supplies Needed:
++Paint Shop Pro ( I used 10 but any version should work)
++Scrap kit Sweet by Designs by Tishia can be purchased from HERE
++Template 33 by Scraps of Enchantment can be found HERE
++Tube of choice or the one I used. I used the artwork Suzanne Wolcott. You must have a valid license in order to use her work. You can purchase her work from HERE
++Font
++Plug ins:
-Muera Meister Copies
**NOTES:
-Add Drop shadow of choice as you go
-You can merger layers as you want to make things easier for yourself.
Open the template in PSP, using your shortcut keys on your keyboard (SHIFT+D) duplicate the template as a new image. Close the original.
Open several papers of choice, resizing as needed. For example, when I look at the blue bar where it tells me what I’ve opened (say like paper 2) it tells me what percentage I’m viewing it at. For me it’s usually 16%, so I resize to 16% bringing it to 100%. ( I hope that made sense!) Once you’ve done this, minimize for later use.
Next go to the bottom template layer and go to selections, select all, then float, selections defloat. Don’t forget to go to selections, none then delete the template layer. Repeat this process for the rest of the template.
Open the bottle cap of your choice. Resize it then copy and paste as a new layer. Use your plug in muera meister copies on the encircle option. Set it at the setting you like. I believe I used 10 with the setting at 70. Move this layer below all the rectangle layers.
Then open another bottle cap. Resize then copy and paste as a new layer. Move it to the upper left of the ones you did on the encircle option. Place it so it overlaps them a bit. Duplicate it and go to image, mirror. Then duplicate it again and go to image, flip. Duplicate once more and go to image, mirror.
Next open the clip of choice, resize it then copy and paste as a new layer. Move it below the top scalloped layer on the right.
Now open your tube of choice, resize it then copy and paste as a new layer. Move into the center of the canvas. Add the eyelet ribbon to the bottom of the rectangles.
Open two of the flowers of your choosing, resize them then copy and paste as new layers. Arrange so one is overlapping the other. Merge down then duplicate it. Move one to the upper left of the tag then the lower right.
Then open your tag of choice, resize then copy and paste as a new layer. Open the button of choice, and add to the end of the tag.
Add your word art or text of your choosing.
Don’t forget your copyrights, license info and tagger markings.
Thanks for trying my tutorial!

No comments:
Post a Comment