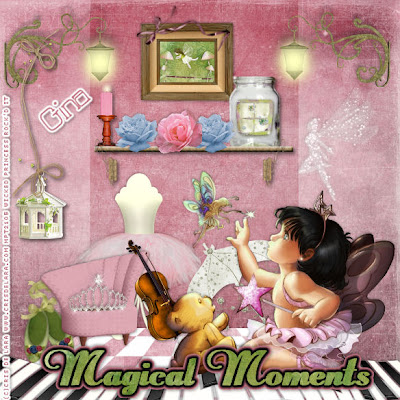
This tutorial was written on March 29, 2010 Shani aka Wicked Princess. The concept of the tag is mine and mine alone. Any resemblance to any other tag/tut is pure coincidence. This was written for those with working knowledge of PSP.
Supplies Needed:
++Paint Shop Pro ( I used 10 but any version should work)
++Scrap kit by called Magic of Dance by Kikeka kits can be found:
++Tube of choice or the one I used. I used the work of Cris De Lara and the artist work can be purchased from www.mypsptubes.com
++Font of choice
++Plug ins:
-Xero, Radiance
**NOTES:
-Add Drop shadow of choice as you go
-You can merger layers as you want to make things easier for yourself.
+*+ This is a FULL size kit!
Open several papers of choice, resizing as needed. For example, when I look at the blue bar where it tells me what I’ve opened (say like paper 2) it tells me what percentage I’m viewing it at. For me it’s usually 16%, so I resize to 16% bringing it to 100%. ( I hope that made sense!) Once you’ve done this, minimize for later use.
Before we get started with the actual tag, we’re going to make the extra’s that make the tag more special.
First open the mason jar frame, and resize it down to where you like. Using your magic wand tool, click inside the frames. Go to selections, modify expand by 3. Add a new raster layer and flood fill with your choice of paper. Move this layer below the jar. Go to selections none. Then open the butterflies, resize then copy and paste as a new layer and adjust as needed. Erase any parts outside of the jar. Merge the layers and minimize for later use.
Now open the golden frame, resize it. Using your magic wand tool, click inside the frame. Go to selections, modify and expand by 5. Add a new layer and flood fill with your choice of paper. Go to selections, none. Move this layer to the bottom. Now open several elements you like to use, and resize them. Make a “scene” in the picture frame. Merge the layers, and minimize for later use.
Now on to the tag! Open the paper that has the room layout. It has the checkered bottom. Resize this paper to the size your comfortable with.
Then open the piano keys. Resize then copy and paste as a new layer to the bottom of the paper. Noticed, I moved mine so it looked like a wavy road.
Open the glitter fairy silhouette and resize. Copy and paste as a new layer to the right side of the “wall”. Move it to where you like it on the wall.
Next open the shelf, resize it then copy and paste as a new layer. Move it to the center wall, move it about a quarter of the way down. Open the candle, roses and maximize the mason jar. Copy and paste as new layer on either end of the shelf. Move it below the shelf layer. This way it looks like it’s actually sitting on the shelf. Erase the parts below the shelf you don’t want to see. Open two roses, resize then copy and paste them as new layers in between the two other elements.
Then maximize your picture, then copy and paste as a new layer to above the shelf layer. Center it as you like it. Move this layer below the mason jar, so it looks like its behind the jar.
Now open the ballet slipper. Resize it then copy and paste as a new layer to the bottom left of the tag. Duplicate it and angle it so it looks like they are paired together.
Open the gazebo on the string. Resize it then copy and paste as a new layer to the left, making it look like it’s hanging on the lamp.
Then open the ballerina skirt mannequin thing. Resize it then copy and paste as a new layer. Move it to the upper left of the paper. More so in the “corner”. Add the pink chair in front of it, and a tiara on top of the chair seat.
Next open the cello, resize it then copy and paste as a new layer. Move it at an angle so it looks like its resting on the arm of the chair. Add the umbrella at an angle to the right of it.
Now open your tube of choice, resize it and add the plug in Xero, Radiance. Set it to the setting you like. I used a very subtle one. Copy and paste it so its at the bottom right. Make it look like it’s sitting on the piano keys.
Finally add your text, copyrights, license info and tagger markings. Save and your done! Thank you for trying my tutorial.

No comments:
Post a Comment