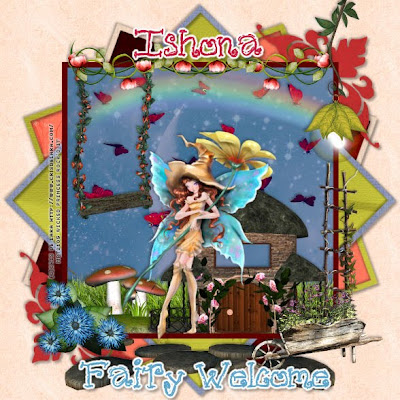
This tutorial was written on April 3, 2010 Shani aka Wicked Princess. The concept of the tag is mine and mine alone. Any resemblance to any other tag/tut is pure coincidence. This was written for those with working knowledge of PSP.
Supplies Needed:
++Paint Shop Pro ( I used 10 but any version should work)
++Scrap kit by called Down at the bottom of the garden by Athena Designs can be purchased HERE
++Template 9 by Alyssa can be found HERE
++Tube of choice or the one I used. I used the work of Cris De Lara which can be purchased from MPT
++Font of choice
**NOTES:
-Add Drop shadow of choice as you go
-You can merger layers as you want to make things easier for yourself.
Open the template in PSP, using your shortcut keys on your keyboard (SHIFT+D) duplicate the template as a new image. Close the original.
Open several papers of choice, resizing as needed. For example, when I look at the blue bar where it tells me what I’ve opened (say like paper 2) it tells me what percentage I’m viewing it at. For me it’s usually 16%, so I resize to 16% bringing it to 100%. ( I hope that made sense!) Once you’ve done this, minimize for later use.
Next go to the bottom template layer and go to selections, select all, then float, selections defloat. Don’t forget to go to selections, none then delete the template layer. Repeat this process for the rest of the template.
Go to the background layer at the bottom of the layers palette, and flood fill the background layer with your choice of paper.
I closed off all the layers except for the square frame layer, and the background layer. Merge the layers. Open the other two layers back up.
Then open the rock pathway. Resize it then copy and paste as a new layer. Move it below the square background layer. Move it to the left then duplicate it. Go to image, mirror.
Now open the butterfly spray, resize it then copy and paste as a new layer. Move it above the background layer. Move towards the top of it.
Next open the rainbow, resize then copy and paste as a new layer towards the top of the background layer. Adjust as needed.
Open the grass, resize then copy and paste as a new layer. Move it to the bottom of the frame layer.
Then open the mushrooms you like, resize it then copy and paste as a new layer, move it to the left. Add the house to the right.
Now open the swing, resize it then copy and paste as a new layer to the upper left of the frame.
Next open the trio flower, the blue ones, resize it then copy and paste as a new layer to the left on the bottom of the frame.
Then open the twig ladder, resize it then copy and paste as a new layer. Move it to the left of the tag, towards the bottom. Add the wheelbarrow with flowers in it to the bottom of that.
Open the flower vines, resize then copy and paste as a new layer to the top of the frame. Duplicate it and go to image, mirror.
Now open the clear ball dangle with the leaves on it. Resize then copy and paste as a new layer, moving to the top of the canvas and adjust as needed.
Next open the tube of choice, resize then copy and paste as a new layer. I moved mine so it looked like it was leaning on the house.
Finally add your text, copyrights, license number and tagger markings. Save and your done!
Thank you for tyring my tutorial.

No comments:
Post a Comment