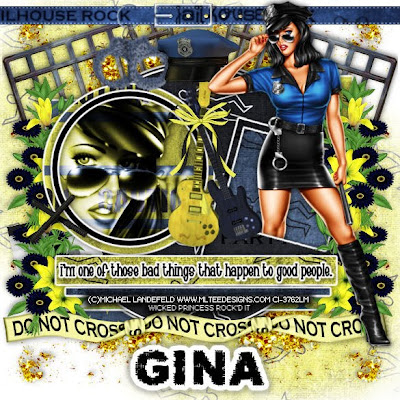
This tutorial was written on June 13, 2010 Shani aka Wicked Princess. The concept of the tag is mine and mine alone. Any resemblance to any other tag/tut is pure coincidence. This was written for those with working knowledge of PSP.
Supplies Needed:
++Paint Shop Pro ( I used 10 but any version should work)
++Scrap kit by called Jail House Rock by Kikeka Kits can be purchased from either of her stores listed on her blog HERE
++Template 355 By Missy can be found HERE
++ Tube of choice or the one I used. I used the artwork of Michael Landfeld and you can purchase his work from HERE
++Font and mask of choice
++Plug Ins:
-Eye candy 4000
**NOTES:
-Add Drop shadow of choice as you go
-You can merger layers as you want to make things easier for yourself.
Open the template in PSP, using your shortcut keys on your keyboard (SHIFT+D) duplicate the template as a new image. Close the original.
Open several papers of choice, resizing as needed. For example, when I look at the blue bar where it tells me what I’ve opened (say like paper 2) it tells me what percentage I’m viewing it at. For me it’s usually 16%, so I resize to 16% bringing it to 100%. ( I hope that made sense!) Once you’ve done this, minimize for later use.
Next go to the bottom template layer and go to selections, select all, then float, selections defloat. Don’t forget to go to selections, none then delete the template layer. Repeat this process for the rest of the template. NOTE: I used the magic wand tool and clicked inside the Polaroid center. Hit the delete key and go to selections, none. Also I changed the opacity to the inside circle back to 100%
Go to the background layer at the bottom of the layers palette, and flood fill the background layer with your choice of paper. Add your mask of choice.
Open the glitter splatter you like. Resize then copy and paste as a new layer. Move to the bottom left of the tag, just above the mask layer. Move and adjust as you like it. Duplicate and go to image, mirror. Merge down one layer. Duplicate it and go to image, flip. Merge down so now all four splats are on the same layer.
Next open the metal jail doors, resize then copy and paste as a new layer. Move below to just above the glitter splat layers. Move towards the top and angle to the left. Duplicate it and go to image, mirror. Adjust as needed.
Now open the bouquet of flowers you like. Resize it then copy and paste as a new layer. Move to the left side of the tag, towards the top. Just below the circles and Polaroid layers. Duplicate it and move to the end of that one. Merge down one layer then duplicate, image mirror.
Now open your tube. Resize it then copy and paste as a new layer. Duplicate it then go to adjust, blur, guassian blur set at 3.00. Change the blend mode to overlay. Change the opacity down to about 75 or just a bit less. This is so it’s not as strong. Merge down one layer. Move the tube so that it’s sitting over the Polaroid frame. We’re going to make it look like she is stepping outside of the frame. Duplicate it then move it below the frame. Erase the bottom part of her leg on the left. You don’t want that part seen. Now on the top tube layer, also remove the part you don’t want seen. Erase it a bit above so that it looks like she is literally stepping outside of it.
I used the close up that came with the tube I purchased. But you can do this just as easily by resizing your tube and cropping. Open your tube, resize it then copy and paste where you like it. Move below the circle frame layer. Duplicate it then go to adjust, blur, guassian blur set to 3.00. Change the blend mode to overlay. Set the opacity to what you like on this layer like you did before. Then merge down one. Change the blend mode to luminance. Using your magic wand tool, click inside the circle frame layer. Go to selections, modify, expand by 4. Go to selections, invert. Then go to selections, none. You know hove a pretty cool effect with out having to use a plug in!
Then open the baton’s, resize then copy and paste as a new layer to the left of the circle frame layer.
Now open two guitars you like, resize then copy and paste as new layer. Move them to the center, between the circle and the other frame. Add a bow towards the top where they meet. Add the police hat towards the top of the guitars, between the doors. Move this layer below the guitars and tube.
Now open the do not cross ribbon, resize then copy and paste as a new layer. Move to the bottom of templates layer. Move so that it is below the flowers layer.
Open the jailhouse rock buckle with the handcuffs. Resize it then copy and paste as a new layer to the top of the tag. Move it below the tube layer though so it’s not covering her.
Finally add your copyrights, license info, tagger markings and text.
Save and your done! Thanks for trying my tutorial.

No comments:
Post a Comment