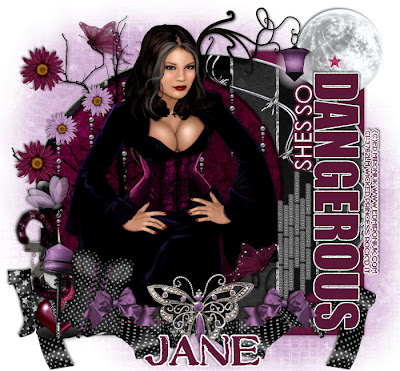
This tutorial was written on June 28, 2010 Shani aka Wicked Princess. The concept of the tag is mine and mine alone. Any resemblance to any other tag/tut is pure coincidence. This was written for those with working knowledge of PSP.
Supplies Needed:
++Paint Shop Pro ( I used 10 but any version should work)
++Scrap kit by JT Designs called Temptation can be found HERE
++Template 291 By Missy can be found HERE
++Tube of choice or the one I used. I used the artwork of Ed Mirounik and can be purchased from HERE
++Font and mask of choice
++Plug Ins:
-Eye candy 4000
**NOTES:
-Add Drop shadow of choice as you go
-You can merger layers as you want to make things easier for yourself.
Open the template in PSP, using your shortcut keys on your keyboard (SHIFT+D) duplicate the template as a new image. Close the original.
Open several papers of choice, resizing as needed. For example, when I look at the blue bar where it tells me what I’ve opened (say like paper 2) it tells me what percentage I’m viewing it at. For me it’s usually 16%, so I resize to 16% bringing it to 100%. ( I hope that made sense!) Once you’ve done this, minimize for later use.
Next go to the bottom template layer and go to selections, select all, then float, selections defloat. Don’t forget to go to selections, none then delete the template layer. Repeat this process for the rest of the template. NOTE: I only added a gradient glow to She’s So.
Go to the background layer at the bottom of the layers palette, and flood fill the background layer with your choice of paper. Add your mask of choice.
Open the folded ribbon of choice. Add to the left of the tag, towards the bottom. Duplicate it and go to image, mirror.
On the large circle behind the others, copy and paste the barb wire. Erase the parts that are hanging over the circle. Do this I go to Selections, float then selections defloat. Then go to selections, invert. On the wire layer, hit the delete key.
Then open the moon, and move it below the big circle layer and move to the right. Adjust it so it sits kind of centered behind the word art.
Now add the light pole, behind the top circle layer to the left a bit.
Open the beaded rain, resize then copy and paste as a new layer. Move it so it’s over the circle layer. go to Selections, float then selections defloat. Then go to selections, invert. On the beaded rain layer, hit the delete key.
Next open the tree and resize, copy and paste as a new layer over the top circle layer and move to the right. Add your choice of flowers through out the tree and a butterfly.
Now open your tube of choice. Resize then copy and paste as a new layer into the center of the circle. Duplicate it and on the bottom layer we’re going to erase some. On your circle layer go to Selections, float then selections defloat. Then go to selections, invert. On the bottom tube layer, hit the delete key. On the top tube layer erase the parts on the bottom you don’t want seen outside the circle.
Then open the handcuffs, corset, zippered heart, candle and boot you like. Cluster them together on te bottom left of the tag. Add the butterfly of your choice into the center of the ribbons where they meet. Add the bows you like to other side.
Finally add any text you like, copyrights, license info and tagger markings. Save and your done! Thanks for trying my tutorial.

No comments:
Post a Comment