Sunday, December 20, 2009

New Layout!


I made his beautiful layout using Oopsie Daisy's Winter's Lullaby kit. I wanted to write the tut for it, but when I went back to get the link for the template, its no longer available :( I was so sad! I will try to do another layout with this kit sometime this week. I used a LOT of the elements from the kit and it really doesn't even do it justice. I really love the kit, and when I found the picture of my daughter Otelia, it just fit. Hard to belive Otelia was only 4 in that picture and now almost 10! Time goes by so quickly.. its so crazy!

Please do stop by Oppsie's blog and check out her fabulous creations!

Wednesday, December 16, 2009

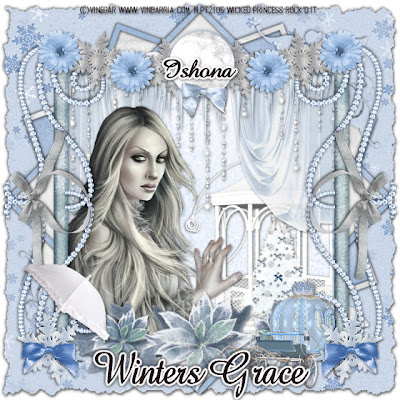
Winters Grace PTU


This tutorial was written on December 16, 2009 Shani aka Wicked Princess. The concept of the tag is mine and mine alone. Any resemblance to any other tag/tut is pure coincidence. This was written for those with working knowledge of PSP.
Supplies Needed:

++Paint Shop Pro ( I used 10 but any version should work)

++Scrap kit called Snow Queen by Athena Designs can be found HERE

++Template 9 by Alyssa can be found HERE

++Tube of choice or the one I used. I used the artwork of Vinegar and it can be purchased HERE


++Font and Mask of choice


Open the template in PSP, using your shortcut keys on your keyboard (SHIFT+D) duplicate the template as a new image. Close the original.

Open several papers of choice, resizing as needed. For example, when I look at the blue bar where it tells me what I’ve opened (say like paper 2) it tells me what percentage I’m viewing it at. For me it’s usually 16%, so I resize to 16% bringing it to 100%. ( I hope that made sense!) Once you’ve done this, minimize for later use.

Next go to the bottom template layer and go to selections, select all, then float, selections defloat. Don’t forget to go to selections, none then delete the template layer. Repeat this process for the rest of the template.

Add a new raster layer and move it to the bottom of the palette. Flood fill with your choice of paper. Add your mask and merge the group.


Open the string doodle you like. Resize then copy and paste as a new layer below the top frame layer. Adjust where you like it.

Next open the gazebo you like, I chose the one with the tree in it. Resize it then copy and paste as a new layer, also under the frame layer. Move it to the right hand side of the tag.

Now open the drapery you like. Resize it then copy and paste as a new layer. Move it to the upper right hand side of the frame . Move it where you like then duplicate it. Go to image, mirror.

Then open the glitter rain, resizing it. Then copy and paste it as a new layer above the drapery layer.

Next add the icicle you like. Resize and adjust as you need to at the top of the frame layer also.

Open your tube of choice, resize it then copy and paste as a new layer. Move it to the left of the gazebo. Adjust as needed.

Now open the frame with the flowers at the bottom. Resize it and then copy and paste as a new layer over the frame layer. Adjust it so it covers the previous frame. Adjust as needed.

Then open the glitter jewels flourish you like. Resize it then copy and paste as a new layer. Go to image, free rotate and rotate it by 90 degrees. Move it to the left of the frame. Duplicate it and go to image, mirror. Duplicate it twice more and flip them both.

Next open the carriage, resize it then copy and paste as a new layer towards the bottom of the tag in the right hand corner.

Open a snowflake you like, resize it then copy and paste as new la new layer. Move it to the right bottom corner of the frame. Duplicate it and go to image, mirror. Add a bow of choice to the top of it.

Next open the umbrella, resize then copy and paste as a new layer, move it below the snowflake layer. Angle it the opposite way.

Then open the ribbon circle with the bow. Resize it then copy and paste as a new layer. Free rotate it to the 90 degree’s again and go to image, mirror. Adjust as needed.

Now open the flower you like, resize it then copy and paste as a new layer. Duplicate it several times and move it across the top of the frame in different spots the way you want it. Add the snow flake you like below these layers.

Open your moon of choice, resize it then copy and paste in the center of the flowers at the top. Add a bow to the bottom of it.

Finally, add your text, copyrights, license info and tagger markings.

Save and your done.

Thanks for trying my tutorial.

Monday, December 14, 2009

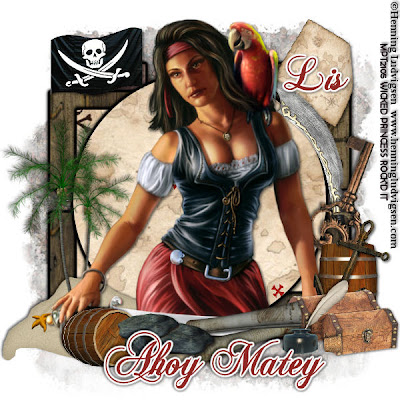
Ahoy Matey PTU


This tutorial was written on December 3, 2009 Shani aka Wicked Princess. The concept of the tag is mine and mine alone. Any resemblance to any other tag/tut is pure coincidence. This was written for those with working knowledge of PSP.
Supplies Needed:

++Paint Shop Pro ( I used 10 but any version should work)

++Scrap kit called Pirate Ohoj by PSP Girl can be found HERE

++Template 51 by Yvette can be found HERE

++Tube of choice or the one I used. I used the artwork of Henning Ludvigsen and it can be purchased HERE

++Plug ins:
-Gradient Glow

++Font and Mask of choice


Open the template in PSP, using your shortcut keys on your keyboard (SHIFT+D) duplicate the template as a new image. Close the original.

Open several papers of choice, resizing as needed. For example, when I look at the blue bar where it tells me what I’ve opened (say like paper 2) it tells me what percentage I’m viewing it at. For me it’s usually 16%, so I resize to 16% bringing it to 100%. ( I hope that made sense!) Once you’ve done this, minimize for later use.

Next go to the bottom template layer and go to selections, select all, then float, selections defloat. Add a gradient glow of your choosing. Don’t forget to go to selections, none then delete the template layer. Repeat this process for the rest of the template.

Add a new raster layer and move it to the bottom of the palette. Flood fill with your choice of paper. Add your mask and merge the group.

Open the folded map, resize it then copy and paste as a new layer. Move to the upper right hand of the template.

Next open the flag of choice, resize it then copy and paste as a new layer to the left of the template.

Now open the sand and tree, resize it then copy and paste as a new layer. Move it to the left of the tag at the bottom.

Add your tube of choice after resizing it into the center of the tag.

Open the treasure box, and barrel of choice. Resize it then copy and paste to the right of the tag as you like them. Add the sword, and key above that layering.

Also add an inkwell and anchor. I moved everything around until I was happy with how it was situated.

Open the rolled map, stones and other barrel, resize them and then copy and paste as a new layers. Adjust them and move as you like

Finally add your text, copyrights and license info. Add your tagger markings also

Save and your done. Thank you for trying my tutorial.

Saturday, December 12, 2009

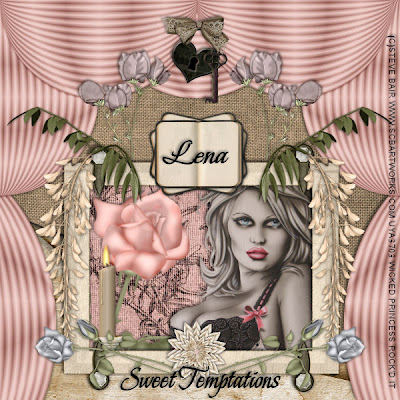
Sweet Temptations


This tutorial was written on December 12, 2009 Shani aka Wicked Princess. The concept of the tag is mine and mine alone. Any resemblance to any other tag/tut is pure coincidence. This was written for those with working knowledge of PSP.
Supplies Needed:

++Paint Shop Pro ( I used 10 but any version should work)

++Vintage Elegance Kit by A-Design by Lena can be purchased HERE

++Tube of choice or the one I used. I used the artwork of Steve Baier and you can purchase his work HERE

++Font of your choice.


**NOTES:
-Add Drop shadow of choice as you go
-You can merger layers as you want to make things easier for yourself.


Let’s get started!

Open the paper of your choosing, resize it to 600x600. Open the curtain/drapery you like and resize it to the same size, 600x600 then copy and paste as a new layer over the paper.

Then open the folded paper with staple in it, resize then copy and paste as a new layer. Move it below the curtain layer and adjust as needed.

Next open the frame with the brads on either ends. Resize then copy and paste as a new layer. Adjust as needed. Use your magic wand tool and click inside the frame. Go to selections, modify, expand by 6. Add a new raster layer and flood fill with your choice of paper. Go to selections, none.

Add your tube, moving it to below the frame layer, resize and adjust as you like. Move it to the right side of the frame.

Open the rose of your choice, resize then copy and paste as a new layer. Move to below the frame layer and to the left of the tube. Erase the parts you don’t want seen outside the frame. Add a candle of choice also.

Now open the bougainville flower of your choice, resize then copy and paste as a new layer. Move this to the top of the frame layer, but make sure it sits behind it. Move one to the left and duplicate it then go to image, mirror.

Then open the droopy flowers (I have no idea what they are called lol) and resize. Copy and paste as a new layer to the left of the frame. Duplicate it and go to image, mirror.

Next open the book, resize it then copy and paste as a new layer to the top center of the frame. Duplicate it twice and on the bottom book layer, angle it either way.

Now open the rose of choice, resize it then copy and paste as a new layer. Move it to the bottom of the frame layer. Angle it so that it goes to the right. Duplicate it and go to image, mirror. Add a daisy of your choosing to the center of that.

Open the lock and key, resize. Then copy and paste as a new layer towards the top of the tag. Add a bow of your choice.

Add your text, copyrights, license info and tagger markings. Save and your done!

Thanks for trying my tutorial!

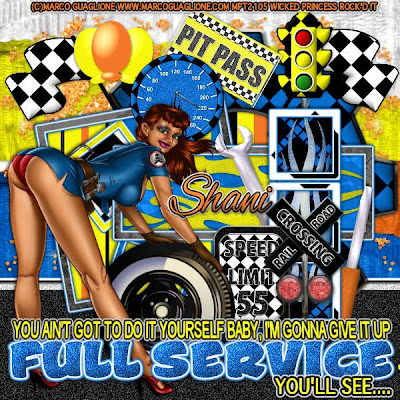
Full Service PTU


Full Service PTU

This tutorial was written on December 12, 2009 Shani aka Wicked Princess. The concept of the tag is mine and mine alone. Any resemblance to any other tag/tut is pure coincidence. This was written for those with working knowledge of PSP.
Supplies Needed:

++Paint Shop Pro ( I used 10 but any version should work)


++Scrap kit H Rod Dreams by me can be purchased HERE
OR HERE OR HERE OR HERE

++Template 83 by Melissaz Creationz can be found HERE


++Tube of choice or the one I used. I used the artwork of Marco Guaglione and it can be purchased from MPT HERE

++Plug ins:
-Eye candy 4000, gradient glow

++Font of your choice.


**NOTES:
-Add Drop shadow of choice as you go
-You can merger layers as you want to make things easier for yourself.

Open the template in PSP, using your shortcut keys on your keyboard (SHIFT+D) duplicate the template as a new image. Close the original. **Increase the canvas size by going to image, canvas size then increase it to 600x600. Also I deleted the word art layer.


Open several papers of choice, resizing as needed. For example, when I look at the blue bar where it tells me what I’ve opened (say like paper 2) it tells me what percentage I’m viewing it at. For me it’s usually 16%, so I resize to 16% bringing it to 100%. ( I hope that made sense!) Once you’ve done this, minimize for later use.

Next go to the bottom template layer and go to selections, select all, then float, selections defloat. Add a gradient glow of choice. Don’t forget to go to selections, none then delete the template layer. Repeat this process for the rest of the template.


Add a new raster layer, flood fill with your choice of paper. Add your mask, and merge group. Move this layer to the bottom.

Open the torn cardboard of your choosing. I decided to use all four colors. Copy and paste each one, mirroring each other in layers. Move them below the template layers. You may be to stretch them out a bit to make them the size you want.

Then open the glitter splat of your choice, copy and paste as a new layer after resizing. Move to the left of the tag in the upper left hand corner. Move it below the template layer, above the ripped cardboard. Duplicate it and go to image, mirror.

Open the asphalt road, copy and paste as a new layer, moving it below the template layer and at the bottom of the tag.

Next open the gear of your choice, resize it then copy and paste as a new layer. Move it above the circle template layer. Adjust as needed.

Now open the checkered flag, resize it then copy and paste as a new layer. Move to the left hand side of the tag, above the gear layer. Duplicate it and go to image, mirror. Add the traffic light, resize it then copy and paste as a new layer, moving it below the right square layers. Adjust as needed.

Open two balloons you like. Resize them then copy and paste as new layers next to the left flag. Group them together as you like.

Then open the pit pass, and speedometer. Resize them then copy and paste as new layers. Move to above the square frame layer, over lapping each other.

Next open the flame you like, resize it then copy and paste as a new layer. Move it below the horizontal rectangle layer. Use your magic wand tool and click inside the rectangle frame. Go to selections, modify and expand by 5. Go to selections, invert and hit the delete key on the flame layer. Go to selections none. Do this again for a flame in the three square layer.

Open the screw driver and wrench, resize them then copy and paste behind the square frame background layer Make sure they are on opposite sides and angle them so they stick out behind it.

Then open the railroad sign, resize it then copy and paste as a new layer. Move it in front of the square frame layer. Adjust as needed.

Open your tube of choice, resize it then copy and paste as a new layer. I moved mine to the left of the tag.

Add your text, copyrights, license info and tagger markings. Save and your done!

Thank you for trying my tutorial!