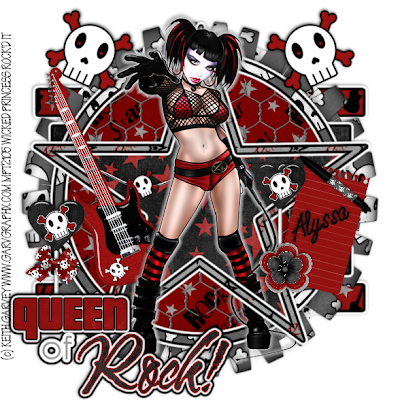
Queen of Rock Tutorial
This tutorial was written on April 28, 2009 By Shani aka Wicked Princess and the concept of the tag is mine and mine alone. Any resemblance to any other tag or tutorial is strictly coincidence.
This tutorial is for anyone with working knowledge of PSP.
Supplies:
Scrap Kit from Kristin @ Wicked Scrapz called Rock Revolution can be found here:
http://kristinswickedscrapz.blogspot.com/2009/03/rock-revolution.html
Template by Alyssa (it’s the one with the star) can be found here: http://alyssastutorials.blogspot.com/2009/04/2-new-templates.html
Tube of choice, I used the artwork of Keith Garvey and you can find it at www.mypsptubes.com
Plugins:
Xero Radiance
Eye Candy 4000 Gradient Glow
Let’s get started!
Open up the template, deleting the info layer. Resize it by 84 % making sure that all layers is checked.
Open several papers of choice from the kit and minimize.
Activate the long rectangle layer first on your layers palette. Go to selections, select all then selections, float then selections defloat. Add a new raster layer and flood fill with your choice of paper. Got to selections none and delete the template layer. With the now filled rectangle layer active, go to your Eye Candy 4000 plug in and select gradient glow. Use the fat gradient glow set to the color black and the glow width of 3.00. Then re do the gradient glow with the same settings but set to white. Repeat these steps for all the template layers EXCEPT the star and circle background layer.
Next open Frame 2, resizing if needed. Copy and paste as new layer and move this layer in between the small rectangle layers. Adjust and resize if needed.
Then open the wire from the kit, you will need to resize this. Copy and paste as a new layer just below the circle frame layer. Make sure the frame layer is active then go to selections, select all then expand by 6. Activate the wire layer and hit delete on your keyboard. Go to selections none.
Open the metal doodle, resizing as needed and copy and paste as a new layer below the star frame layer. With the frame layer activated, go to selections, select all, then selections expand by 6. Click on the doodle layer and hit delete on your keyboard. Go to selections none.
Open your tube of choice and copy and paste as a new layer. Adjust where you would like for it to be. I used the plug in Xero, Radiance to add a different kind of effect to the tube. This is optional, If you use it, just hit random or mess with the settings until you find the one you like.
Add a thin white gradient glow to the tube to make it stand out a bit more.
This is optional: I made her pop out of the frame a little by doing the following….
Duplicate the tube once you have added all effects. Move one layer below the frame layer. On the top tube layer use your eraser brush and erase parts that you want the frame to show through. Use my finished tag as a guide.
Next add the elements of your choosing, resizing and adjusting as needed. Add text or word art of choice.
Don’t forget your copyright info and license number for the tube you used if needed! Add tagger info and your all done!
Thank you for trying out my tutorial

No comments:
Post a Comment