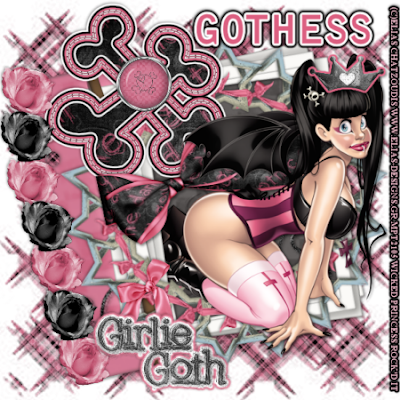
Girlie Goth-FTU
*-* SPECIAL NOTE ABOUT THIS TUTORIAL : I originally made this tag for a friend because I swear this tube looks JUST like her! Lol.. I hope you enjoy it!
This tutorial was written on June 13, 2009 by Shani aka Wicked Princess. The concept of the tag is mine and mine alone. Any resemblance to any other tag/tut is pure coincidence. This was written for those with working knowledge of PSP.
Supplies Needed:
++Paint Shop Pro ( I used 10 but any version should work)
++ Scrap kit by Cupcake Sprinkles called Girly Goth can be found HERE
++Tube of choice or the one I used. I used the artwork of Elias Chatzoudis. You can purchase his work from HERE
++Plug ins:
-Eye Candy 4000 Gradient glow
-Muera Meister Copies
++Mask of choice and font of choice
Let’s get started!
**NOTES:
-Add Drop shadow of choice as you go
-You can merger layers as you want to make things easier for yourself.
Open a new canvas, 600x600. Remember you can crop or resize later.
Open several papers of choice, resizing as needed. For example, when I look at the blue bar where it tells me what I’ve opened (say like paper 2) it tells me what percentage I’m viewing it at. For me it’s usually 16%, so I resize to 16% bringing it to 100%. ( I hope that made sense!) Once you’ve done this, minimize for later use.
Flood fill the layer with your choice of paper. Add mask of your choice and remember to merge group. From there duplicate this layer and go to image, mirror.
Open the frame of choice and resize. Copy and paste as a new layer and place at an angle. Using your magic wand tool, click inside the frame and go to selections, expand. Add a new raster layer and flood fill with your choice of paper.
Next open the star with ribbon, resize and copy and paste into the center of the canvas. Use your Muera Meister Copies plug in, use the encircle setting and set to the setting you like.
Open the crossbones element. Add a large gradient glow using white and a color from the kit. Use the magic wand tool and click on the inside of the cross bones. Go to selections modify and expand by 4. Add a new raster layer and flood fill with your choice of paper. Got to edit, copy merged and add as a new raster layer onto the working canvas.
Add a bow of choice, adjusting and resizing as needed. Stretch it as needed too.
Add your tube of choice, resizing and placing where you like. I duplicated the tube and moved one below the frame layer. On the top layer, I erased the parts I didn’t want visible. This way she looks like she’s jumping out of the frame.
Open the crown element, resize then copy and paste as a new layer. Make sure its at the top of the layer palette. Place it above her head, as if she is wearing a crown. Add a gradient glow of your choosing.
Place a bow of choice at the bottom hole, and bracket. Open your roses of choice, resize as needed then copy and paste as new layers, duplicating and alternating. Move them to the edge of the frame on the left hand side.
Add your word art of choice or text of choice.
Don’t forget you copyright, license info and tagger markings. Thanks for trying my tut!

No comments:
Post a Comment