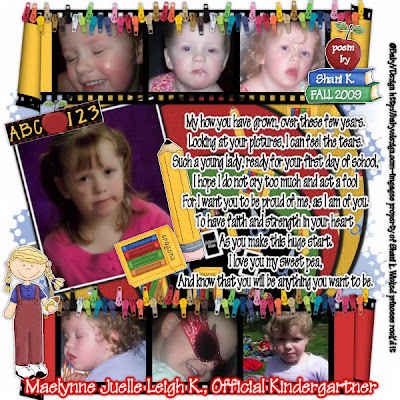
Official Kindergartner PTU
This tutorial was written on July 24, 2009 by Shani aka Wicked Princess. The concept of the tag is mine and mine alone. Any resemblance to any other tag/tut is pure coincidence. This was written for those with working knowledge of PSP.
Supplies Needed:
++Paint Shop Pro ( I used 10 but any version should work)
++Scrap kit by Baby V Designs called Kindergarten Dayz can be purchased HERE
++Template 9 by me can be found HERE
++ 7 images of choice. I used 7 pictures of my daughter Maelynne.
++Plug ins:
-Eye Candy 4000 Gradient Glow
++Font and mask of choice
Let’s get Started!
**NOTES:
-Add Drop shadow of choice as you go
-You can merger layers as you want to make things easier for yourself.
Open the template in PSP, using your shortcut keys on your keyboard (SHIFT+D) duplicate the template as a new image. Close the original.
Open several papers of choice, resizing as needed. For example, when I look at the blue bar where it tells me what I’ve opened (say like paper 2) it tells me what percentage I’m viewing it at. For me it’s usually 16%, so I resize to 16% bringing it to 100%. ( I hope that made sense!) Once you’ve done this, minimize for later use.
Next go to the bottom template layer and go to selections, select all, then float, selections defloat. Don’t forget to go to selections, none then delete the template layer. Add a fat gradient glow of your choosing. Repeat this process for the rest of the template.
Add a new raster layer and flood fill with your choice of paper. Add your mask and merge the group.
Open two of the film frames you like. Minimize one of them and start working with the one. Open three of the pictures you want to use. Note: I did the digitial noise removal to soften the pictures. Copy and paste the first picture into the first frame. Resize as needed. Using your magic wand tool, click inside the frame. Go to selections, invert. Go back to the image layer and hit delete on your keyboard. Go to selections, none. Continue this for the other two frames.
minimize this, and repeat the process for the other film frame. When your satisfied, merge the layers. Minimize this one we’ll use them in a second.
Open your main picture and resize it. I did the digital noise removal on this one too. Add a gradient glow you like to this picture. Copy and paste as a new layer and place at an angle on the left side of the canvas.
Next copy and paste your first film frame and move to the bottom. Add the second one and move to the top.
Then add the clip string after resizing to the top of both frames to make it look like its being clipped on by it.
Open the pencil and crayon clip art. Copy and past as new layers and place on the edges of your main picture. Add the mini chalkboard to the top of it.
Choose one of the children clip art and resize. Copy and paste as a new layer to the left of the bottom frame. Add the books and apple to the opposite corner of the top frame.
Add any text that you like, and if you choose to use the images and no tubes, please credit the maker of the kit.
Save and your done! Thank you for trying my tutorial.

No comments:
Post a Comment