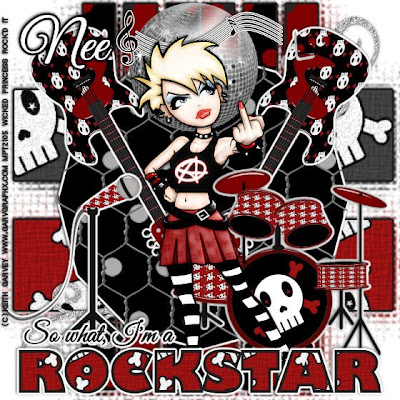
This tutorial was written on July 15, 2009 by Shani aka Wicked Princess. The concept of the tag is mine and mine alone. Any resemblance to any other tag/tut is pure coincidence. This was written for those with working knowledge of PSP.
Supplies Needed:
++Paint Shop Pro ( I used 10 but any version should work)
++Scrap kit called Rock my world by Nee @ Envied and Admired Scraps can be purchased HERE OR HERE OR HERE
++Template 10 also by Nee can be found HERE
++Tube of choice or the one I used. I used the artwork of Keith Garvey which can be purchased HERE
++Plug ins:
-Eye candy 4000-Gradient Glow
-Xero Radiance
++Effects:
-Blur
-Textures, Mosaic Glass
+Font of choice
Let’s get Started!
**NOTES:
-Add Drop shadow of choice as you go
-You can merger layers as you want to make things easier for yourself.
Open the template in PSP, using your shortcut keys on your keyboard (SHIFT+D) duplicate the template as a new image. Close the original.
Open several papers of choice, resizing as needed. For example, when I look at the blue bar where it tells me what I’ve opened (say like paper 2) it tells me what percentage I’m viewing it at. For me it’s usually 16%, so I resize to 16% bringing it to 100%. ( I hope that made sense!) Once you’ve done this, minimize for later use.
Next go to the bottom template layer and go to selections, select all, then float, selections defloat. Don’t forget to go to selections, none then delete the template layer. Repeat this process for the rest of the template.
Go to your rectangle layer, the bottom one with the horizontal ones. Merge just these, you will need to close off all the other layers. Duplicate it, and go to your effects, texture, mosaic glass. I used the default setting. Then go to adjust, blur. Repeat this process for the large rectangles.
Open your glitter doodle of choice, resize then copy and paste as a new layer. Move it to the bottom left corner of the tag and move below the octagon layer. Duplicate it then go to image mirror, then image flip.
Next open the wire of your choice, copy and paste as a new layer. Move it to above the octagon layer.
Activate you octagon layer, go to selections, select all then float and defloat. Then go to selections, invert. Go to your wire layer and hit delete on your keyboard. Back to the octagon layer and go to selections, none.
Open the disco ball, resize. Copy and paste as a new layer towards the top of the tag, center it the best you can.
Next open the guitar of your choice, add a gradient glow. Resize then copy and paste as a new layer. Angle it so the guitar is upside down and angled. Move it to the upper right hand of the tag. Duplicate it and go to image mirror.
Add the drum set, with a gradient glow added. Place in the bottom lower part of the tag. Add the microphone and stand to the opposite side also with a gradient glow.
Open the musical note strand of your choice. Add a gradient glow to it and resize. Copy and paste as a new layer towards the top over the disco ball.
Next open your tube of choice and add your plug in , Xero Radiance. I used a random setting. Copy and paste as a new layer into the center of the tag. Make adjustments as needed.
Finally add your text, copyrights, license info, and tagger markings.
Save and your done!
Thanks for trying my tutorial.

No comments:
Post a Comment