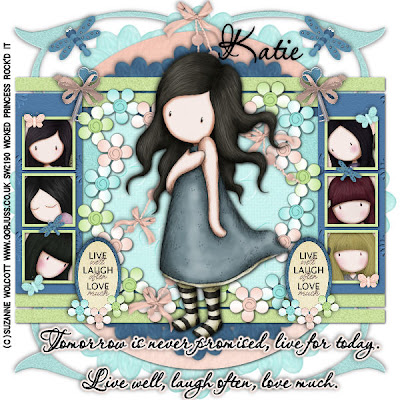
Tomorrow is never promised-PTU
This tutorial was written on July 21, 2009 by Shani aka Wicked Princess. The concept of the tag is mine and mine alone. Any resemblance to any other tag/tut is pure coincidence. This was written for those with working knowledge of PSP.
Supplies Needed:
++Paint Shop Pro ( I used 10 but any version should work)
++Scrap kit by Katie at Crazed Creations called Live, Laugh Love can be purchased HERE
++Template 20 Wacky Scraps can be found HERE
++7 tubes of choice or the ones I used. I used the artwork of Suzanne Wolcott. You can purchase her work
++Tube of choice or the one I used. I used the artwork of Suzanne Wolcott. You can purchase her work HERE
++Plug ins:
-Muera Meister Copies
++Font of choice
**NOTES:
-Add Drop shadow of choice as you go
-You can merger layers as you want to make things easier for yourself.
Open the template in PSP, using your shortcut keys on your keyboard (SHIFT+D) duplicate the template as a new image. Close the original.
Open several papers of choice, resizing as needed. For example, when I look at the blue bar where it tells me what I’ve opened (say like paper 2) it tells me what percentage I’m viewing it at. For me it’s usually 16%, so I resize to 16% bringing it to 100%. ( I hope that made sense!) Once you’ve done this, minimize for later use.
Next go to the bottom template layer and go to selections, select all, then float, selections defloat. Don’t forget to go to selections, none then delete the template layer. Repeat this process for the rest of the template **NOTE I deleted the word art layer.
Open your doodle of choice. Copy and paste as a new layer and place to the left of the tag. Duplicate it go to image, mirror. Close off all other layers, then merge these two together. Duplicate this one and go to image, flip. Merge these together and open all other layers.
Choose a flower you like from the kit, resize it, then copy and paste as a new layer. Use your muera meister copies plug in and the encircle option. I believe I used x and y shift at 65. Use the number of flowers you like. Move this layer below the circle template layer.
Open another flower of choice, and do the same thing however make the shifty 45 or 50 and your choice on the number. Move this one above the circle layer, but below the rectangle.
Next open your first tube of choice, resize and crop as needed. Copy and paste under the frame, in the first square. Use your magic wand tool and click inside the frame. Go to selections, modify expand by 3. Selections, invert and then go to the tube layer. Hit delete on your keyboard. Repeat this for the other 5 frames and tubes.
Open Frame 1 and resize. Copy and paste as a new layer, centering it in the center of your tag. Adjust as you like it. Using your magic wand tool and click inside the frame. Go to selections, expand by 5. Add a new raster layer and flood fill with your choice of paper. Go to selections none. Move this layer below your frame layer.
Next open the bow and doodle you like, resize as needed then copy and paste as a new layer. Move it to the top of the circle layer and center it. It should now flow down overlapping the frame and paper.
Add your final tube, centering it as you like it.
Next add the plaque of your choice to either side of the tube near, the frames.
Open the dragon fly, and butterflies of your choice. Copy and paste them as a new layer through out the tag as you like.
Add your text, copyright info, license info and tagger markings
Save and your done
Thank you for trying my tutorial.

No comments:
Post a Comment