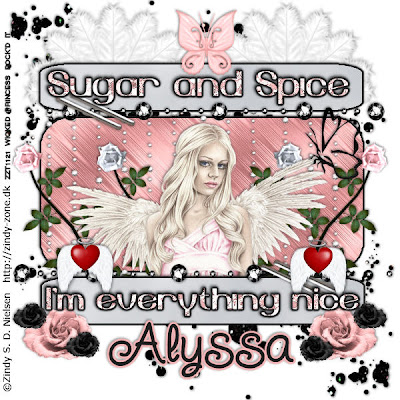
Everything Nice PTU
This tutorial was written on August 3, 2009 by Shani aka Wicked Princess. The concept of the tag is mine and mine alone. Any resemblance to any other tag/tut is pure coincidence. This was written for those with working knowledge of PSP.
Supplies Needed:
++Paint Shop Pro ( I used 10 but any version should work)
++Scrap kit by Alyssa called Good Vs. Evil can be purchased HERE
++Template 17 by Bev @ Horseplays Pasture can be found HERE
++Tube of choice or the one I used. I used the artwork of Zindy Nielsen can be purchased HERE
++Plug ins:
Eye Candy 4000 Gradient glow
++Mask and font of choice
++Plug ins:
-Eye Candy 4000 Gradient Glow
**NOTES:
-Add Drop shadow of choice as you go
-You can merger layers as you want to make things easier for yourself.
Open the template in PSP, using your shortcut keys on your keyboard (SHIFT+D) duplicate the template as a new image. Close the original.
Open several papers of choice, resizing as needed. For example, when I look at the blue bar where it tells me what I’ve opened (say like paper 2) it tells me what percentage I’m viewing it at. For me it’s usually 16%, so I resize to 16% bringing it to 100%. ( I hope that made sense!) Once you’ve done this, minimize for later use.
Next go to the bottom template layer and go to selections, select all, then float, selections defloat. Don’t forget to go to selections, none then delete the template layer. Add a gradient glow on the fat setting the colors of your choice. Repeat this process for the rest of the template.
Add a new raster layer, and flood fill with your choice of paper. Add your mask and merge group. Send this to the bottom of the layers palette.
Open the glitter splat of choice, resize then copy and paste as a new layer to the upper left part of the canvas. Move this to the bottom layer. Duplicate it and go to image mirror.
Choose a new bling rain you like. Resize then copy and paste as a new layer, moving below the smaller rectangle layer. Adjust so it looks like its blanketing behind them.
Open two roses you like. Resize, then copy and paste as new layers. Angle slightly to the left, spaced apart a bit. Duplicate then go to image, mirror.
Add your tube of choice so that it sits behind the rectangle layers. Adjust the roses as needed.
Open the feather fan you like. Copy and paste as a new layer to the upper left hand side below the rectangle layer. Duplicate it then go to image, mirror. Add a butterfly of your choice to the center.
Next add the single string of bling you like between the large rectangle and the smaller one at the top. Duplicate it then go to image, mirror then image flip. Adjust and move as needed.
Open the two roses you like, resize then copy and paste as new layers in bundles at the bottom corners of the lower rectangle layers.
Next add the staples to both rectangle layers as well as the wings with a heart. Move these to the outer side of the tube.
Add your text, copyrights, license number and tagger markings.
Save and your done!
Thanks for trying my tutorial.

No comments:
Post a Comment