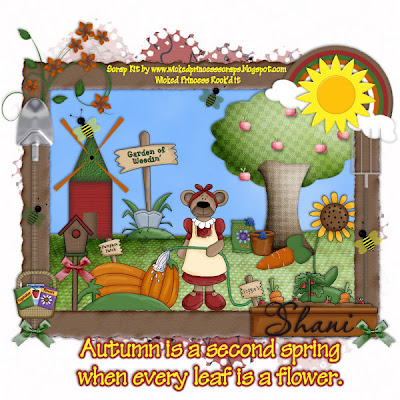
Second Spring PTU
This tutorial was written on August 26, 2009 by Shani aka Wicked Princess. The concept of the tag is mine and mine alone. Any resemblance to any other tag/tut is pure coincidence. This was written for those with working knowledge of PSP.
Supplies Needed:
++Paint Shop Pro ( I used 10 but any version should work)
++Scrap kit by me called Autumn Garden can be purchased HERE OR HERE
++Plug ins:
-Alien Skin Xenofex 2, little fluffy clouds
++Font and Mask of choice
Let’s get Started!
**NOTES:
-Add Drop shadow of choice as you go
-You can merger layers as you want to make things easier for yourself.
Open a new canvas of 600x600. You can always resize later. Open your paper of choice, flood fill the canvas and add your mask. Merge the group.
Next open your frame of choice, then copy and paste as a new layer into the center of the canvas.
Open the grass hill element. Resize it then copy and paste as a new layer below the frame layer.
Use your magic wand tool and click inside of the frame. Go to selections, modify expand by 10. Add a new raster layer and move it below the hill layer. Add your plug in light fluffy clouds. I used the hazy setting.
Now we’re going to build our scene. Open the windmill, resize it then copy and paste as a new layer. Make sure this is below the frame layer. Move it to the upper left, just above the hill. Then open the pumpkin “patch” and resize. Copy and paste it then move towards the bottom of the frame on the left.
Open the tree, and sunflower. Copy and paste the tree and move it to the upper right hand side, make it look as though its on the hill, and “planted” there. Add the sunflower to the lower right hand side.
Add the bear with a hose clip art and move it so the hose and water are spraying on the pumpkins. You may need to resize and adjust the bear.
Now open the birdhouse and a bow. Resize them then copy and paste as a new layer. Move to the bottom left of the frame next to the pumpkin patch.
Next open the garden of weedin’ sign and resize. Copy and paste it as a new layer, move it to the upper left next to the windmill.
Open the bag and bucket with gloves clip art and the carrot. Resize then copy and paste as a new layer by the base of the tree.
Then open the rainbow and the sun elements. Copy and paste as new layer to the upper right hand side of the frame. Move the rainbow at an angle.
Next open the flower doodle of your choice. Copy and paste as a new layer to the upper right of the template. Angle it slightly to the right.
Open the shovel and pitch fork and resize. Copy and paste each on the opposite sides of the frame.
Add the window box clipart to the bottom of the frame on the right hand side. Add a bow to either side of the bottom of the frame.
Open the basket and the seed packets. Resize then copy and paste as new layers to the left hand side of the frame on the bottom.
Add two bee’s randomly through out the tag where you like.
Finally add your text. If you choose not to use a tube for this, please do credit me for the kit with my url such as I have.
Save and your done.
Thanks for trying my tutorial.

No comments:
Post a Comment