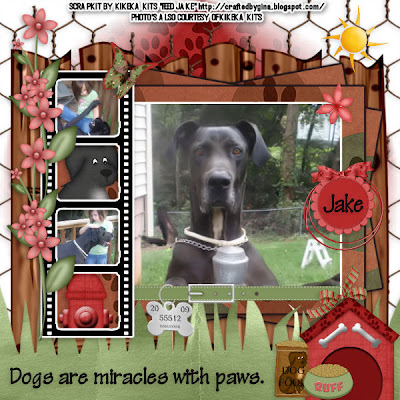
This tutorial was written on September 28, 2009 by Shani aka Wicked Princess. The concept of the tag is mine and mine alone. Any resemblance to any other tag/tut is pure coincidence. This was written for those with working knowledge of PSP.
Supplies Needed:
++Paint Shop Pro ( I used 10 but any version should work)
++Scrap kit by KiKeka Kits called Feed Jake can be purchased HERE
++Template 26 by Horseplay’s Pasture can be found ++Template 41 by Horseplays Pastures can be found HERE
++ Picture of choice or tubes of your choosing. I chose to use three pictures supplied by Gina. **Note there ARE tubes in the kit.
++Plug ins:
-Eye Candy 4000 Gradient glow
++font and mask of choice
**NOTES:
-Add Drop shadow of choice as you go
-You can merger layers as you want to make things easier for yourself.
Open the template in PSP, using your shortcut keys on your keyboard (SHIFT+D) duplicate the template as a new image. Close the original.
Open several papers of choice, resizing as needed. For example, when I look at the blue bar where it tells me what I’ve opened (say like paper 2) it tells me what percentage I’m viewing it at. For me it’s usually 16%, so I resize to 16% bringing it to 100%. ( I hope that made sense!) Once you’ve done this, minimize for later use.
Next go to the bottom template layer and go to selections, select all, then float, selections defloat. Add a gradient glow of your choice. Don’t forget to go to selections, none then delete the template layer. Repeat this for the remainder of the template. *Note I removed the doodle on the upper right hand side. You won’t need this.
Go to your large rectangle layer. Duplicate it twice. Select the bottom rectangle and using your pick tool, angle it to the left where you like it. On the second layer, Angle it the opposite direction. It should now look like a few fanned out cards.
Add a new raster layer and send it to the bottom. Flood fill with your choice of paper. Add your mask of choice and merge the group.
Now open the wire fencing of your choice. Resize then copy and paste as a new layer, moving it above the mask layer.
Then open the wooden fence element. Resize as needed and copy and paste as a new layer above the wire fencing. Adjust as needed.
Take your first photo, resize it then copy and paste as a new layer. On the smaller rectangle layer, go to selections, select all, selections, float then defloat. Now do selections, invert. On the picture layer, hit the delete key. Delete the rectangle layer. Add a gradient glow of your choice. Add the collar of choice to the bottom of the photo where you like it.
Now open the grass element. Resize as needed then copy and paste as a new layer towards the bottom of the canvas.
Open and resize your other two pictures. Copy and paste each one into the first and third frame on the left hand side, in the film strip. Use your magic wand tool, click inside the top frame, expand by 5 and hit delete on the picture layer. Repeat this for the other picture. Add the puppy dog and fire hydrant to the other frame openings and repeat the cropping process of before.
Open the flower of choice, resize it then copy and paste as a new layer at the upper right hand corner of your picture. Add a bow of choice to the bottom left hand corner.
Then open the flower sprigs you like, resize then copy and paste as a new layer to the left hand side of the film strip layer. Duplicate it and move one above the other. Adjust as needed. Then add a butterfly of choice to the right hand corner of this frame at the top.
Next add the dog house, doggie bowl and dog food bag to the bottom right hand corner of the tag.
Open the sun , resize it then copy and paste as a new layer in to the upper right hand corner of the tag.
Add any copyrights, credits, and tagger markings.
Save and your done!
Thanks for trying my tutorial

No comments:
Post a Comment