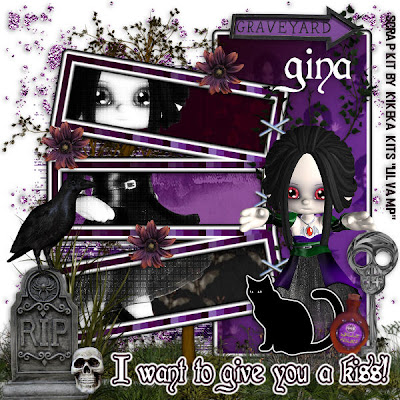
This tutorial was written on September 26, 2009 by Shani aka Wicked Princess. The concept of the tag is mine and mine alone. Any resemblance to any other tag/tut is pure coincidence. This was written for those with working knowledge of PSP.
Supplies Needed:
++Paint Shop Pro ( I used 10 but any version should work)
++Scrap kit by KiKeka Kits called Lil Vamp can be purchased HERE
++Template 41 by Horseplays Pastures can be found HERE
++Tube of choice or the one I used. I used the tube that was in the kit.
++Plug ins:
-Xero, Radiance
-Xero Grayscaler
-Penta dot and cross
-Eye Candy Gradient Glow
++Font and mask of choice
++font and mask of choice
**NOTES:
-Add Drop shadow of choice as you go
-You can merger layers as you want to make things easier for yourself.
Open the template in PSP, using your shortcut keys on your keyboard (SHIFT+D) duplicate the template as a new image. Close the original.
Open several papers of choice, resizing as needed. For example, when I look at the blue bar where it tells me what I’ve opened (say like paper 2) it tells me what percentage I’m viewing it at. For me it’s usually 16%, so I resize to 16% bringing it to 100%. ( I hope that made sense!) Once you’ve done this, minimize for later use.
Next go to the bottom template layer and go to selections, select all, then float, selections defloat. Add a gradient glow of your choice. Don’t forget to go to selections, none then delete the template layer. Repeat this for the remainder of the template.
Add a new raster layer, and send to the bottom Flood fill with your choice of paper and add your mask and remember to merge group.
Open the glitter splat of choice. Resize it if needed then copy and paste as a new layer. Move this layer below the template layers. Also move to the upper right hand side. Duplicate it, go to image, mirror. Duplicate it again and go to image, flip. Once more duplicate and go to image, mirror.
Add the grass element to the bottom of the canvas. Duplicate it and move as you need to fill in the areas you need.
Open the tree you like, resize it as needed. Copy and paste as a new layer. Move it below the template frame layers. Center it as needed.
Now open one of the tubes. Copy and paste as a new layer. Move it below the template frame layers. Add your plug in, Xero Greyscaler on the default setting. Then Penta dot and cross on the default setting. Finally, Xero Radiance on what ever setting you like. Using your magic wand tool, click inside the template frame layers. Go to selections, expand by 5. Go to selections, invert. On the tube layer, hit delete. Go to selections none.
Open the ivy branch, resize it as needed. Copy and paste as a new layer, moving it to the right hand side of the rectangle layer.
Add your tube to the center of the up right rectangle layer. Adjust as you like and move it below the cat layer.
Now add the tall grass to the right hand side of the canvas, at the bottom left corner. Add a tombstone above that layer. Also add the skull. Then add the crow of choice to the top of the tombstone.
Add the potion bottle next to the cat. And then add a flower of choice where you like it between the frames.
Finally add your text of choice, copyright and any licensing info. Notice I didn’t use any outside tubes so I credited the scrap designer.
Save and your done! Thank you for trying my tutorial.

No comments:
Post a Comment