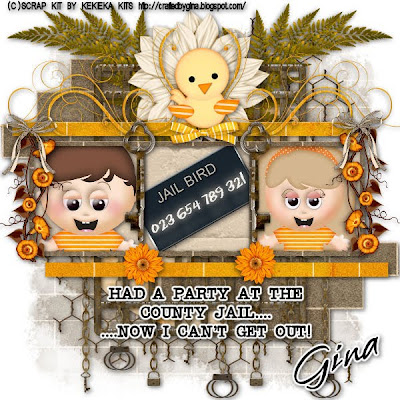
County Jail Party (PTU, Charity)
This tutorial was written on October 27, 2009 by Shani aka Wicked Princess. The concept of the tag is mine and mine alone. Any resemblance to any other tag/tut is pure coincidence. This was written for those with working knowledge of PSP.
Supplies Needed:
++Paint Shop Pro ( I used 10 but any version should work)
++Scrap kit by Gina called Jail Bird can be purchased HERE Please note Jail Bird is a Charity kit and all proceeds go the Jail Ministries. Please check it out!
++Template 44 by Tracy at Freebie Friends can be found HERE
++Tube of choice. I used the clip art dolls from the kits.
++Font and Mask of choice
Let’s get Started!
**NOTES:
-Add Drop shadow of choice as you go
-You can merger layers as you want to make things easier for yourself.
Open the template in PSP, using your shortcut keys on your keyboard (SHIFT+D) duplicate the template as a new image. Close the original. **Increase the canvas size by going to image, canvas size then increase it to 600x600.
Open several papers of choice, resizing as needed. For example, when I look at the blue bar where it tells me what I’ve opened (say like paper 2) it tells me what percentage I’m viewing it at. For me it’s usually 16%, so I resize to 16% bringing it to 100%. ( I hope that made sense!) Once you’ve done this, minimize for later use.
Next go to the bottom template layer and go to selections, select all, then float, selections defloat. Don’t forget to go to selections, none then delete the template layer. Repeat this process for the rest of the template.
Add a new raster layer, flood fill with your choice of paper. Add your mask, and merge group. Move this layer to the bottom.
Open the chain link fencing and resize if needed. Copy and paste as a new layer. Move it below the circle layer just above the mask layer.
Next open the bricks element. Resize it then copy and paste as a new layer, move to the upper left hand corner. Duplicate it and go to image, mirror.
Now Open the leaf branch, resize it then copy and paste as a new layer, moving to the upper left hand corner of the tag. Duplicate it and go to image, mirror.
Then open the jail door, resize it then copy and paste it as a new layer into the center of the canvas. Make sure this is just above the circle layer.
Open the flower of choice, resize it then copy and paste as a new layer. Move to the upper center part of the tag.
Next open both of the clip art dolls and resize them. Copy and paste as new layers, moving to the below the frame layers. Adjust as needed. Then using your magic wand tool, Click inside the frame, go to selections, modify, then expand by 7. Go to selections, invert. On the doll layers, hit delete on your keyboard. Go to selections, none.
Then open the Jail bird sign, resize it then copy and paste as a new layer into the center frame.
Now open the chain links with keys and handcuff’s resize it then copy and paste as a new layer. Move it to the bottom of the rectangle layers.
Open the flower bunch of choice. Resize it then copy and paste as a new layer to the left of the frame. Duplicate it and go to image, mirror. Add a bow of choice to the top of it.
Open the flourish of choice. Resize and rotate it. Copy and paste as a new layer, moving to the top of the rectangle layers. Duplicate it then go to image, mirror. Add a bird of choice to the center of the flourish where it meets (also the center of the flower) and a bow at the birds feet.
Add the key element after resizing to the middle of the bars between the frames. Then add the flower of choice to the bottom of the keys.
Add any text, copyrights, and tagger markings.
Save and your done!
Thank you for trying my tutorial.

No comments:
Post a Comment