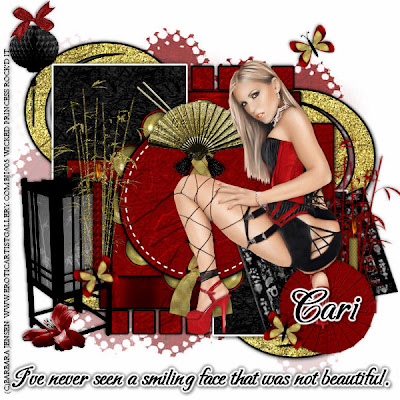
This tutorial was written on December 3, 2009 Shani aka Wicked Princess. The concept of the tag is mine and mine alone. Any resemblance to any other tag/tut is pure coincidence. This was written for those with working knowledge of PSP.
Supplies Needed:
++Paint Shop Pro ( I used 10 but any version should work)
++Scrap kit by A SwtlyreCreation called Orient Express can be purchased HERE
++Template 7 by Wacky Scraps can be found HERE
++Tube of choice or the one I used. Used the artwork of Barbara Jensen and you may purchase her artwork HERE
++Plug ins:
-Gradient Glow
-Muera Meister Copies
++Font and Mask of choice
Open the template in PSP, using your shortcut keys on your keyboard (SHIFT+D) duplicate the template as a new image. Close the original.
Open several papers of choice, resizing as needed. For example, when I look at the blue bar where it tells me what I’ve opened (say like paper 2) it tells me what percentage I’m viewing it at. For me it’s usually 16%, so I resize to 16% bringing it to 100%. ( I hope that made sense!) Once you’ve done this, minimize for later use.
Next go to the bottom template layer and go to selections, select all, then float, selections defloat. Add a gradient glow of your choosing. Don’t forget to go to selections, none then delete the template layer. Repeat this process for the rest of the template.
Add a new raster layer and move it to the bottom of the palette. Flood fill with your choice of paper. Add your mask and merge the group.
Open the bead of choice. Resize it then copy and paste as a new layer. Use your plug in muera meister copies on the encircle option. Set the x and y at 40. Use whatever number you like. Move this layer below the circle template layer.
Then open the light box of choice. Resize it and copy then paste as a new layer to the bottom left of the tag. Add the flower of choice to the bottom of it.
Next open the divider of your choice. Resize it then copy and paste as a new layer to the right of the tag, angle it a little.
Now open the flower branch you like, resize then copy and paste as a new layer. Move it to the center of the divider and add a candle. Then add the umbrella towards the bottom of this bundle.
Then open up the other flower branch you like, copy and paste as a new layer and move over by the light box. Add a candle of choice, and then a butterfly to the bottom of it.
Open the laced bow, resize it then copy and paste as a new layer. Move it to the center of the circle layer. Towards the top add a set of chopsticks, angled then add the fan and tassels you like to the center.
Now open the ball light of your choice, resize it then copy and paste as a new layer into the upper left of the tag. Add a bow of choice to the very top. Now add a butterfly you like over the tag as you like.
Add your text, copyrights, license and tagger markings.
Save and your done!
Thanks for trying my tutorial.

No comments:
Post a Comment