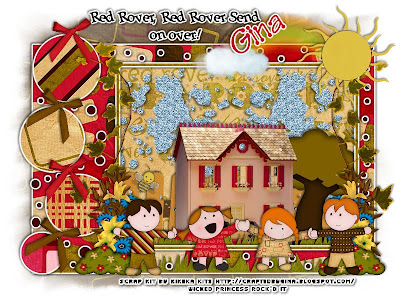
This tutorial was written on February 20, 2010 Shani aka Wicked Princess. The concept of the tag is mine and mine alone. Any resemblance to any other tag/tut is pure coincidence. This was written for those with working knowledge of PSP.
Supplies Needed:
++Paint Shop Pro ( I used 10 but any version should work)
++Scrap kit Gina of Kikeka kits called Red Rover can be found on her blog as a freebie HERE
++Template 155 by Ali can be found HERE
++Tube of choice or the one I used. I used the clip out kiddo’s that come with the kit. If you don’t use any outside tubes, please credit back to the designers blog.
++Plug ins:
-Eye Candy 4000 Gradient Glow
++Font and Mask of choice
**NOTES:
-Add Drop shadow of choice as you go
-You can merger layers as you want to make things easier for yourself.
Open the template in PSP, using your shortcut keys on your keyboard (SHIFT+D) duplicate the template as a new image. Close the original.
Open several papers of choice, resizing as needed. For example, when I look at the blue bar where it tells me what I’ve opened (say like paper 2) it tells me what percentage I’m viewing it at. For me it’s usually 16%, so I resize to 16% bringing it to 100%. ( I hope that made sense!) Once you’ve done this, minimize for later use.
Next go to the bottom template layer and go to selections, select all, then float, selections defloat. Don’t forget to go to selections, none then delete the template layer. Add a gradient glow of your choice. Repeat this process for the rest of the template.
Add a new raster layer and flood fill with your choice of paper. Add your choice of mask and merge group. Move this layer below your template layers.
Open the blue glitter splat. Resize then copy and paste as a new layer. Move below the frame layer. Duplicate it and go to image, mirror. Adjust as needed. Using your magic wand tool click inside the frame layer. Go to selections modify, expand by 10. Then go to selections, invert. On the splat layers, hit the delete button.
We’re going to create a scene with in the frame.
Then open the tree, resize and copy and paste as a new layer to the right side, under the frame. Erase the parts seen outside of the frame.
Now open up the house, resize it then copy and paste as a new layer. Move to the center bottom of the frame layer. Add the grass to the bottom of the house. Duplicate the grass and move down at the bottom of the rectangle layer.
Copy and paste the fence after resizing below the house layer. Add a bee above the fence.
Next open the ivy, resize it then copy and paste as a new layer. Duplicate it and move one on the left side of the frame layer and the other on the other side.
Open the flower bouquet. Resize as needed then copy and paste as a new layer to the left and bottom of the frame layer. Duplicate it and go to image, mirror.
Then open the bows of choice, resize them then copy and paste as a new layer. Duplicate them and move them accordingly between the circle layers.
Now open the bush, resize it then copy and paste as a new layer to the left and right of the bottom grass layer. Adjust as needed.
Next add the children playing red rover to the bottom above the bush layer. Resize and adjust as needed.
Open the sun, resize it then copy and paste as a new layer. Move it to the upper right of the tag. Add the rainbow and cloud of your choice next to the sun layer. Move them below the layer.
Finally add your text, copyrights, license info and tagger markings. Save and your done!

No comments:
Post a Comment