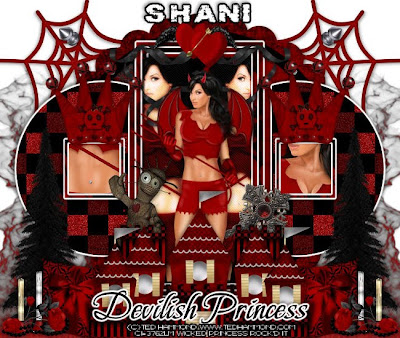
This tutorial was written on March 26, 2010 Shani aka Wicked Princess. The concept of the tag is mine and mine alone. Any resemblance to any other tag/tut is pure coincidence. This was written for those with working knowledge of PSP.
Supplies Needed:
++Paint Shop Pro ( I used 10 but any version should work)
++Scrap kit by called Wicked Princess – The Kit can be purchased from HERE
++Template 104 by Yvette can be found HERE
++Tube of choice or the one I used. I used the work of Ted Hammond and you can purchase his work from HERE Note that the tube I used specifically was a part of a promotion. I’m not sure if it’s on sale by itself now.
++Font of choice
++Plug ins:
-Xero, Radiance
-Eye Candy 4000 Gradient Glow
-Penta.com, Jeans.
**NOTES:
-Add Drop shadow of choice as you go
-You can merger layers as you want to make things easier for yourself.
Open the template in PSP, using your shortcut keys on your keyboard (SHIFT+D) duplicate the template as a new image. Close the original.
Open several papers of choice, resizing as needed. For example, when I look at the blue bar where it tells me what I’ve opened (say like paper 2) it tells me what percentage I’m viewing it at. For me it’s usually 16%, so I resize to 16% bringing it to 100%. ( I hope that made sense!) Once you’ve done this, minimize for later use.
Next go to the bottom template layer and go to selections, select all, then float, selections defloat. Don’t forget to go to selections, none then delete the template layer. Add a gradient glow of your choosing. Repeat this process for the rest of the template. I removed the word art layer and the heart layers.
Then open the smoke element. Resize it as needed then copy and paste as a new layer. Move it to the bottom left of the tag. Duplicate it and go to image, mirror.. Adjust as needed.
Now open the spiderweb you like, resize then copy and paste as a new layer in the upper left corner of the canvas. Duplicate it and go to image, mirror.
Next open the metal studs, resize then copy and paste as a new layer into the center of the canvas. Move it below the template layers.
Open the circle frame, resize then copy and paste as a new layer. Using your magic wand tool, click inside the frame. Go to selections, modify, expand by 5. Add a new raster layer and flood fill with you choice of paper. Go to selections, none and move this paper below the frame layer.
Then open the tree, resize then copy and paste as a new layer to the left of the canvas. Make sure its just above the half circle layers. Duplicate it and go to image, mirror.
Now open your tube of choice. Resize then copy and paste as a new layer. Move it to the left, over the small square layer. On the square layer, go to selections, select all, selections, float and then selections defloat. Then go to selections, invert. Go to the tube layer, and hit delete. Go to selections, none. Do the same thing to the opposite square.
Then copy and paste your tube again, this time place it slightly to the left in the rectangle layer. Using your plug in Xero, radience, set to your chosen setting. Then use the plug in penta, jeans. Again set to the setting you like. Duplicate it, then go to image mirror. On the rectangle layer go to selections, select all, selections, float and then selections defloat. Then go to selections, invert. Go to the tube layer, and hit delete. Go to selections, none. Adjust these as you need too.
Copy and paste your tube once more, into the center of the rectangle. Resize as needed again.
Open the castle, resize it then copy and paste as a new layer to the bottom center of the canvas. Center it as needed. Make sure this is the top layer.
Then open the pillow, resize it then copy and paste as a new layer. Move it below the castle, and to the left of it. Duplicate it and go to image, mirror.
Next open the double candle’s. Resize then copy and paste as a new layer to the left of the pillow. Duplicate it and go to image, mirror.
Now open the curly ribbon. Resize it then copy and paste as a new layer. Move it to the top right of the rectangle layer. Duplicate it and go to, image, mirror. Add the double heart with wings to the top center.
Open the cross, resize it then copy and paste as a new layer. Move it below the castle layer, but towards the top of it. So it looks like its peeking up. Add the voo doo doll to the other side of it.
Then open the crown, resize then copy and paste as a new layer. Move it to the top of the rectangle on the left. Duplicate it and go to image, mirror.
Finally add your text, copyrights and tagger markings. Save and your done! Thanks for trying my tutorial.

No comments:
Post a Comment