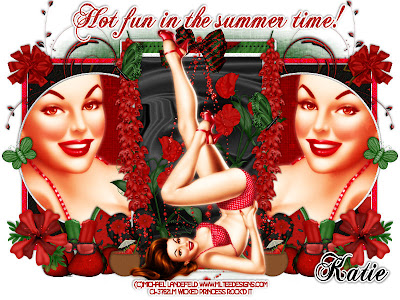
This tutorial was written on May 23, 2010 Shani aka Wicked Princess. The concept of the tag is mine and mine alone. Any resemblance to any other tag/tut is pure coincidence. This was written for those with working knowledge of PSP.
Supplies Needed:
++Paint Shop Pro ( I used 10 but any version should work)
++Scrap kit by called For Fruitylicious by Crazed’s Creations can be found HERE
++Template 331 By Missy can be found HERE
++Tube of choice or the one I used. I used the artwork of Michael Landenfeld and can be purchased from HERE
++Font and mask of choice
**NOTES:
-Add Drop shadow of choice as you go
-You can merger layers as you want to make things easier for yourself.
Open the template in PSP, using your shortcut keys on your keyboard (SHIFT+D) duplicate the template as a new image. Close the original.
Open several papers of choice, resizing as needed. For example, when I look at the blue bar where it tells me what I’ve opened (say like paper 2) it tells me what percentage I’m viewing it at. For me it’s usually 16%, so I resize to 16% bringing it to 100%. ( I hope that made sense!) Once you’ve done this, minimize for later use.
Next go to the bottom template layer and go to selections, select all, then float, selections defloat. Don’t forget to go to selections, none then delete the template layer. Repeat this process for the rest of the template. .
Go to the background layer at the bottom of the layers palette, and flood fill the background layer with your choice of paper. Add your mask of choice.
Open the doodle of your choosing. Resize it then copy and paste as a new layer. Move it to just below the middle rectangle layers and to the left. Duplicate it and go to image, mirror. Adjust as needed.
Then open you tube of choice. I used the close up that came with the tube I chose. The original close up lays to the side. I rotated it and then moved it to where I liked it on the left circle. Duplicate it then go to adjust, blur, guassian blur set to 3.00. Change the blend mode on this layer to overlay. Merge down one layer. Change the blend mode on this layer to screen. Duplicate it and then go to image, mirror. Back on the left circle layer, go to selections, select all then selections, defloat. Now selctions, invert and on the tube layer hit the delete key. Go to selections, none. Do the same thing for the opposite side.
Next open the vine flower you like, resize then copy and paste as a new layer. Move it to the center rectangle layer, towards the top. Duplicate it and move the other one to the bottom right of the rectangle.
Then open the butterfly you like, resize then copy and paste as a new layer to outside of the circle on the left, where you like it. Duplicate it and move to the other side where you like it.
Open the spray doodle you like, resize then copy and paste as a new layer. Move it to the upper center of the rectangle you like, then add a bow of your choosing to the top of that.
Now open a bow of your choosing then resize and copy and paste as a new layer to the upper left corner of the outside rectangles at the top. Duplicate it then go to image, mirror.
Next open the heather flower stalks, resize then copy and paste as a new layer. Move them to the outside of the center rectangle. Duplicate it then go to image, mirror. Adjust as needed.
Now we’re going to make our groupings on the bottom of the circle layers. First open the strawberry bundle. Resize then copy and paste as a new layer at the bottom of the circle layer. To make things easier, just assume your going to duplicate it all and mirror it to the other side. Now add the watermelon slice, moving it below the strawberries and angle it. Move it toward the right of the strawberries. Now open both Popsicles, resize them and paste them to the left of the watermelon. Cross and angle them like in the example. Pick the flip flop you like, resize then copy and paste as a new layer. Move them to the right of the watermelon, again all under the strawberries layer. Duplicate the flip flop to make a “pair” angle them as you like. Add a pair of sunglasses to the top (and above the ) strawberries. Then add a coconut drink to the right of the strawberries. And finally the flower of your choice to the corner above the strawberries. Add another butterfly you like through out the tag.
Open you other tube of choice, resize then copy and paste as a new layer into the center of the canvas.
Add your text, copyrights and tagger markings. Save and your done!
Thank you for trying my tutorial!

No comments:
Post a Comment