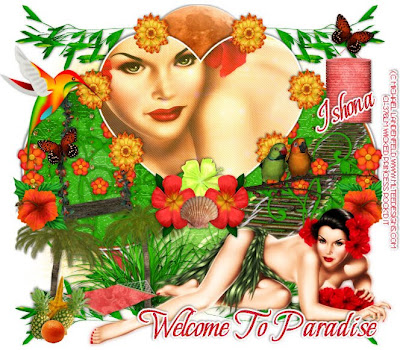
This tutorial was written on May 23, 2010 Shani aka Wicked Princess. The concept of the tag is mine and mine alone. Any resemblance to any other tag/tut is pure coincidence. This was written for those with working knowledge of PSP.
Supplies Needed:
++Paint Shop Pro ( I used 10 but any version should work)
++Scrap kit by called Tropical Paradise by Athena Designs can be found HERE
++Template 290 By Missy can be found HERE
++Tube of choice or the one I used. I used the artwork of Michael Landenfeld and can be purchased from HERE
++Font and mask of choice
++Plug Ins:
-Eye candy 4000
-penta jeans
**NOTES:
-Add Drop shadow of choice as you go
-You can merger layers as you want to make things easier for yourself.
Open the template in PSP, using your shortcut keys on your keyboard (SHIFT+D) duplicate the template as a new image. Close the original.
Open several papers of choice, resizing as needed. For example, when I look at the blue bar where it tells me what I’ve opened (say like paper 2) it tells me what percentage I’m viewing it at. For me it’s usually 16%, so I resize to 16% bringing it to 100%. ( I hope that made sense!) Once you’ve done this, minimize for later use.
Next go to the bottom template layer and go to selections, select all, then float, selections defloat. Don’t forget to go to selections, none then delete the template layer. Repeat this process for the rest of the template. NOTE: I deleted the word art layers. I also only added a gradient glow to all layers BUT the inter circle layers.
Go to the background layer at the bottom of the layers palette, and flood fill the background layer with your choice of paper. Add your mask of choice.
Then open the leafy branches. Resize then copy and paste as a new layer. Move it to the top and behind all the template layers. Duplicate it and go to image, mirror. Merge down one layer then duplicate it and go to image, flip.
Now open moon element, resize it then copy and paste as a new layer. Move it below the heart template layer at the top.
Open the glitter rain you like, resize then copy and paste as a new layer. On the circle layers, go to selections, select all, selections, defloat then selections, invert. On the rain layer, hit the delete key and then go to selections, none.
Next open the viney flower, resize then copy and paste as a new layer to the left of the circle layer on the left.
Then open the grass bunch, resize it then copy and paste as a new layer to the bottom left of the canvas. Duplicate it then go to image, mirror.
Open the swing, resize it then copy and paste as a new layer to the upper center of the circle layer on the left. Erase the parts you don’t want seen outside of the frame. Add the butterfly you like to one side of the
Now open the bamboo bridge, resize then copy and paste as a new layer. Place over the circle layer where you like it. On the circle layer , go to selections, select all, selections, defloat then selections, invert. On the bridge layer, hit the delete key and then go to selections, none.
Go back to the viney flower layer on the right, duplicate it then go to image, mirror. Move this to above the bridge layer.
Open your tube of choice. I ‘m using the close up that came with the tube I chose. Copy and paste your tube, centering it in the heart as you like it. Duplicate it then go to adjust, blur, guassian blur set to 3.00. Change the blend mode to opacity and merge down one layer. Using your plug in penta, jeans, set it to the setting you like. On the heart layer go to selections, select all, selections, float then selections, defloat. Now selections, invert and on the tube layer, hit the delete key. Go to selections, none. Change the opacity to 75.
Add the flower of your choosing after resizing to around the heart.
Then open the parrots on the twig, resize then copy and paste as a new layer. Move it to the right circle layer, around the center of it.
Next open the palm trees with the hammock you like, resize then copy and paste as a new layer to the bottom left of the canvas. Add two pineapples, orange and the starfish you like to the bottom left of the palm tree.
Open the paper lantern light, resize then copy and paste as a new layer to the upper right of the canvas. Add a butterfly to the top of it.
Then open the hibiscus flower of your choosing, resize it then copy and paste as a new layer on the left side, just above the palm trees. Duplicate then go to image, mirror.
Now open the other hibiscus flower you like, resize then copy and paste as a new layer. Move to the bottom center of the heart. Add another flower you like to either side of that. Add a shell to the bottom center of these flowers.
Next open the hummingbird you like resize then copy and paste as a new layer to the upper left of the circles.
Add your tube of choice to the bottom left of the tag.
Finally add your text, copyrights, license info and tagger markings! Save and your done! Thank you for trying my tutorial!

No comments:
Post a Comment