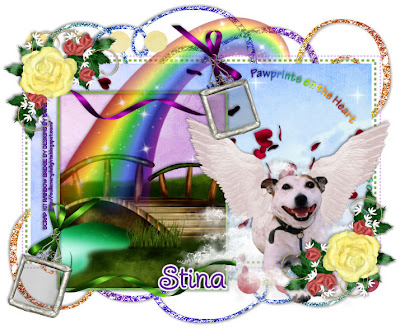
This tutorial was written on June 19, 2010 Shani aka Wicked Princess. The concept of the tag is mine and mine alone. Any resemblance to any other tag/tut is pure coincidence. This was written for those with working knowledge of PSP.
Supplies Needed:
++Paint Shop Pro ( I used 10 but any version should work)
++Scrap kit by Designs by Stina called Rainbow Bridge can be purchased from any of the stores Stina sells at. You can find them on her blog
++Template 150 By Designs by Ali can be found HERE
++Tube of choice or the one I used. I used the puppy with wings included in the kit
++Font and mask of choice
**NOTES:
-Add Drop shadow of choice as you go
-You can merger layers as you want to make things easier for yourself.
Open the template in PSP, using your shortcut keys on your keyboard (SHIFT+D) duplicate the template as a new image. Close the original.
Open several papers of choice, resizing as needed. For example, when I look at the blue bar where it tells me what I’ve opened (say like paper 2) it tells me what percentage I’m viewing it at. For me it’s usually 16%, so I resize to 16% bringing it to 100%. ( I hope that made sense!) Once you’ve done this, minimize for later use.
Next go to the bottom template layer and go to selections, select all, then float, selections defloat. Don’t forget to go to selections, none then delete the template layer. Repeat this process for the rest of the template.
Now open the glitter doodle you like. Resize then copy and paste as a new layer. Move to the bottom of the template layer. Duplicate it and go to image, mirror then image, flip. Arrange as you need to.
Open the circle word art you like. Resize then copy and paste as a new layer. Move to the right of the tag, below the frame and background layers.
Next open the heart cutouts splatter. Resize then copy and paste as a new layer. Move it where you like on the canvas. Make sure it’s still below the frame and background layers.
Now open the bridge scene with rainbow you like. Resize it then copy and paste as a new layer. Adjust it where you want it under the frame layer. Make sure it’s situated just as you want it. Duplicate it and move one layer above the frame layer. On the frame layer, use your magic wand tool and click inside the frame. Go to selections, modify, expand by 2. On the bottom bridge layer, hit the delete key. Go to selections none. On the top rainbow bridge layer, erase the parts all around that you do not want showing outside of the frame EXCEPT the rainbow at the top. Now it should look like the rainbow is shooting out of the top of it.
Then open the tube of choice or the puppy as I did. Resize then copy and paste as a new layer to the right of the frame. Adjust as you like it.
Open the ribbon with frame, resize it then copy and paste as a new layer to the bottom left of the frame. Add another one to the upper part of the frame, but mirrored. They should look like they are opposite of each other.
Next open the jasmine and rose cluster bouquet you like. Resize then copy and paste as a new layer. Move to the upper left of the tag. Duplicate it and go to image, mirror then image, flip.
Finally add your text, any copyrights, license info and tagger markings. Save and your done!
Thank you for trying my tutorials.

No comments:
Post a Comment