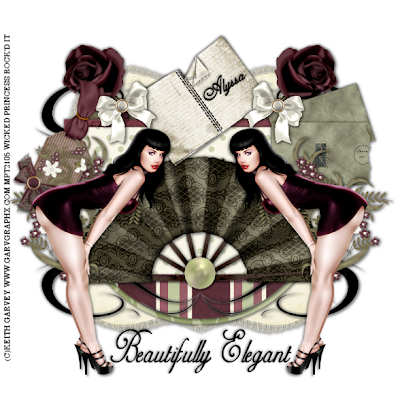
Beautifully Vintage
This tutorial was written on April 21, 2009 for those with knowledge of PSP. The concept of this tutorial is mine and mine alone. Any resemblance to any other tutorial is completely coincidental.
Supplies needed:
Kinda Vintage by Yvette @ Misfits Scrapz, and you can find it here:
http://misfitsscrapz.blogspot.com/2008/08/new-scrapkit-kinda-vintage.html
Template # 1 by Alyssa @ Alyssa’s Tutorials and you can find it here:
http://alyssastutorials.blogspot.com/2009/04/template-1.html
Tube of choice, I used the artwork of Keith Garvey and you can find his work at www.mypsptubes.com Make sure you use your correct license info on the tag.
Plug Ins (optional)
Xero-Radiance
Let’s get this going!
*Note add drop shadow of choice as you go through
Open your template and delete the top layer.
Open your choice of Bracket 1 or 2 from the kit, copy and paste as new layer and move this layer to the bottom, below your circle layer.
Next open 5 papers of choice and minimize. You’ll be using these in the materials palette under patterns.
Click on the first circle layer activating it. Click on your magic wand tool, and click inside the circle. Go to selections, float then selections defloat. This helps to not make the edges look so jagged.
Add a new raster layer, and activate your flood fill tool. Go to the materials palette and under the pattern tab, choose your paper of choice. Flood fill on the new raster layer. Go to selections, none. Delete the circle template layer. Continue this for each layer of the template.
Open rose 2, resize as needed and copy and paste above the doodle layer. Add drop shadow of choice and then duplicate. Go to image, mirror and it should show up on the opposite side.
Next open fan 2, resize as needed and copy and paste above the last rectangle layer. Open Pearl 3 and resize as necessary, copy and paste it putting in over the center bottom of the fan.
Open Painted flower1, resizing and copy and paste to the left side of the rectangles. Duplicate this layer and go to image, mirror. Adjust if needed.
Next open Envelope 1, resize and copy and paste as a new layer above the left painted flower. So that it falls just below the right one.
Open Tag1, resize and copy and paste to the left of the rectangles , angling as you like
Open the book, resize and copy and paste as a new layer. Angle it to the right, adjusting as needed.
Add the bows to the stems of the rose.
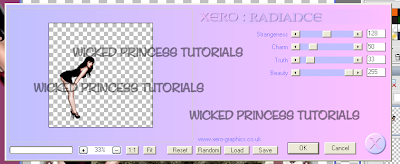
Next open your tube of choice, and use the plug in Xero, Radiance. You may play with the settings, or use the ones I did shown below in a screen shot.

Duplicate the layer and go to image, mirror.
Add text of choice.
Don’t forget to add your copyright info and license info!
Save and your done!
Thank you for trying out my tutorial!

No comments:
Post a Comment