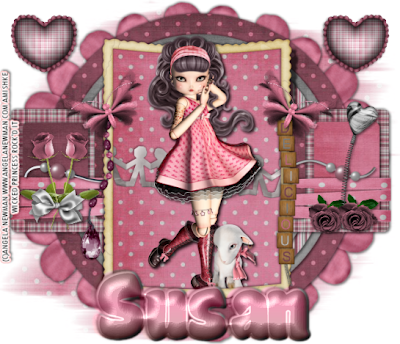
Deliciously Girly Tutorial
This tutorial was written on April 19, 2009 and the concept of the tag is mine. Any resemblance to any other tag is coincidental.
Supplies needed:
Delicious scrap kit by Blue Dream Designs, can be found here:
http://bluedreamdesigns.blogspot.com/2009/03/delicious-freebie.html
Template by Rebel Chick can be found here:
http://whispersofamemory.blogspot.com/2009/03/2-new-templates-4-u.html
Tube of choice, I used the artwork of Angela Newman and you can find her work @ www.artisticminds.com
Plug in Muera Meisters Copies
Mask of choice
Let’s get this party started!
*note add drop shadow of choice through out as you go.
Open the template and delete the copyright layer. Also remove the staple layer, we won’t be using it.
Open several papers of choice, and minimize them.
Click on the bottom template layer and add a raster layer. Move this blank layer to the very bottom.
Flood fill the area with a paper of choice. Add your mask, and remember to merge group.
Next open a flower of your choice from the kit, you may need to resize just a little. Place in center of your canvas.
Go to your plug in Muera Meister Copies, and from the drop down menu select encircle. Make your settings what you would like, keeping in mind this is going to go below the first circle layer. Click ok. You may need to adjust the size a bit.
Move this layer below the first circle template so that the petals just peek out.
Make the first template layer active. Using your magic wand tool, click inside of the circle. You should see dancing ants around it. Go to selections, float then selections, defloat. This helps take away the jagged edging you get when you flood fill the area. Add a new raster layer, and flood fill with the paper of your choice. Go to selections none and delete the template layer.
Continue this for each layer until you have a completely filled template.
Next pic the scalloped frame from the kit, open and resize as needed.
Copy and paste it into the center of your canvas. Using your magic wand tool, click inside the frame. Go to selections, modify, expand and expand by 6. Add a new raster layer and flood fill with your choice of paper. Go to selections, none. Move this layer just below your frame.
Add your tube of choice. You’ll notice I have it so her foot and the animals feet are inside the frame, yet her head is out of the frame. To do this I added the drop shadow I wanted to use and then duplicated the layer. I moved the second tube layer (the duplicate) just below the frame layer. On the top tube layer above the frame, I used the eraser tool and erased the parts I didn’t want to show outside the frame.
Next go through and add the elements of your choosing. You can go by what I did or make or do it your way J
Add your text if you choose any, the copyright info for the tube, license number if needed and your tagger info.
Save and your all done!
I hope you enjoyed this tut, and I would love to see your results!
Thank you for trying this out!

No comments:
Post a Comment