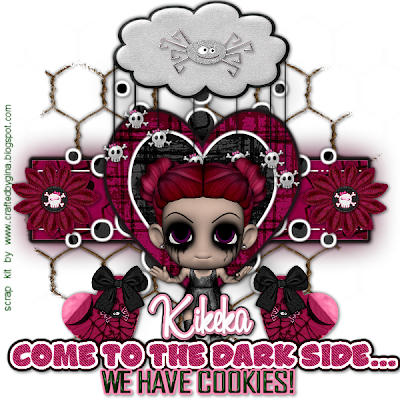
Dark Side and Cookies –PTU
This tutorial was written on May 29, 2009 by Shani aka Wicked Princess. The concept of the tag is mine and mine alone. Any resemblance to any other tag/tut is pure coincidence. This was written for those with working knowledge of PSP.
Supplies Needed:
++Paint Shop Pro ( I used 10 but any version should work)
++Scrap kit by KikeKa Kits can be purchased HERE
++Wicked Template 8 by me can be found HERE
++Mask and Font of choice
++Plug Ins:
Eye Candy 4000 Gradient Glow
++Effects
-Blur
Let’s get started!
**NOTES:
-Add Drop shadow of choice as you go
-You can merger layers as you want to make things easier for yourself.
Open the template in PSP, using your shortcut keys on your keyboard (SHIFT+D) duplicate the template as a new image. Close the original.
Open several papers of choice, resizing as needed. For example, when I look at the blue bar where it tells me what I’ve opened (say like paper 2) it tells me what percentage I’m viewing it at. For me it’s usually 16%, so I resize to 16% bringing it to 100%. ( I hope that made sense!) Once you’ve done this, minimize for later use.
Next go to the bottom template layer and go to selections, select all, then float, selections defloat. Don’t forget to go to selections, none then delete the template layer. Add a gradient glow on the fat setting with the color black. Repeat this process for the rest of the template. **you can change the gradient glow to white for the splat if you like.
Duplicate the splat template layer and send to the bottom. Go to adjust, blur, gauassian blur and add your choice of settings. Duplicate rectangle 1 and do the same thing. Move the duplicated layer to above the blurred splat layer.
Open the rusty wire element. Copy and paste as a new layer and move below the rectangle 1 layer. Add your mask of choice.
Next open the cloud element, copy and paste as a new layer. Center it to just above the heart layer, so the skulls hang over slightly. Add your spider of choice to the center of the cloud.
Add your flower of choice to either side of the rectangles. Also add your heart and bow of choice to either side, towards the bottom.
Pick out the Emo girl tube of your choice from the kit and copy and paste, centering in the middle of the tag,
Add your text of choice. If you don’t use a PTU tube or one that requires copyright credit, please credit the kit designer such as I have on the tag.
Don’t forget to save and your done!
Thank you for trying my tutorial.

No comments:
Post a Comment