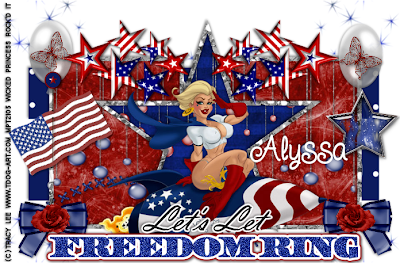
Let’s Let Freedom Ring-FTU
This tutorial was written on June 18, 2009 by Shani aka Wicked Princess. The concept of the tag is mine and mine alone. Any resemblance to any other tag/tut is pure coincidence. This was written for those with working knowledge of PSP.
Supplies Needed:
++Paint Shop Pro ( I used 10 but any version should work)
++Scrap kit “Independence Day” by Alyssa can be found HERE
++Template132 by Ali can be found HERE
++Tube of choice. I used the artwork of Tracy Lee and it can be purchased HERE
Let’s get started!
**NOTES:
-Add Drop shadow of choice as you go
-You can merger layers as you want to make things easier for yourself.
Open the template in PSP, using your shortcut keys on your keyboard (SHIFT+D) duplicate the template as a new image. Close the original.
Open several papers of choice, resizing as needed. For example, when I look at the blue bar where it tells me what I’ve opened (say like paper 2) it tells me what percentage I’m viewing it at. For me it’s usually 16%, so I resize to 16% bringing it to 100%. ( I hope that made sense!) Once you’ve done this, minimize for later use.
Next go to the bottom template layer and go to selections, select all, then float, selections defloat. Don’t forget to go to selections, none then delete the template layer. Repeat this process for the rest of the template.
Choose one of the sparkles you like out of the kit and copy and paste as a new layer. Move this layer to the bottom and move it to the upper left corner of the tag. Duplicate it and go to image, mirror. Duplicate it again and go to image, flip. Then once more duplicate it and go to image, mirror. Adjust as needed.
Open one of the stitches, resizing then copy and paste as a new layer towards the bottom of the template frame. Make sure that the ends are just right at the frame edge.
Next open one of the dangle elements and resize. Copy and paste as a new layer, moving it to below the frame layer. Open the other one, resizing smaller and paste as a new layer above the star but below the star frame layer. Using your magic wand tool, click inside the star frame and go to selections, modify, expand and expand by 4. Go back to the dangle layer and hit delete.
Choose a balloon from the elements. Resize then copy and paste as new layer. Move to the left on the frame, duplicate then go to image mirror. Adjust as needed. Add a butterfly of choice to the balloon itself. Resize and adjust as needed.
Add your tube, and move into center of the star area.
Open a bow and rose of your choice. Resize then copy and paste as new layers. Place one set to the left of the tag on the bottom rectangle frame. Duplicate then go to image, mirror. Adjust as needed.
Next open the tiny stars, resize then copy and paste as new layer. Move them to the top of the rectangle frame , to the left. Duplicate then go to image, mirror.
Open the flag, and pin of choice. Copy and paste as new layers to the left of the rectangle frame. Place the pin accordingly. Paste a star of choice on the opposite side.
Add text of choice, copyright info, license info and tagger markings.
Save and your done!
Thank you for trying my tutorial.

No comments:
Post a Comment