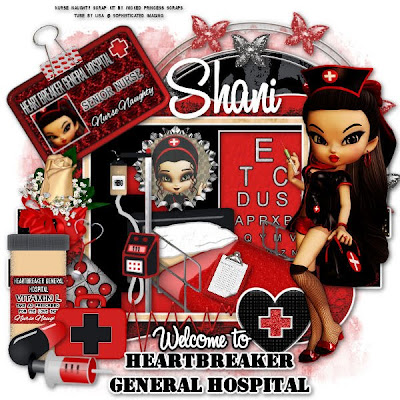
Heartbreaker General Hospital PTU
This tutorial was written on October 27, 2009 by Shani aka Wicked Princess. The concept of the tag is mine and mine alone. Any resemblance to any other tag/tut is pure coincidence. This was written for those with working knowledge of PSP.
Supplies Needed:
++Paint Shop Pro ( I used 10 but any version should work)
++Nurse Naughty Scrap kit by me can be purchased HERE
++Template40 by Tracy at Freebie Friends can be found HERE
++Tube of choice, or the one I used. I used the tube from the kit.
++Plug ins: Eye Candy 4000 Gradient Glow
++Font and Mask of choice
Let’s get Started!
**NOTES:
-Add Drop shadow of choice as you go
-You can merger layers as you want to make things easier for yourself.
Open the template in PSP, using your shortcut keys on your keyboard (SHIFT+D) duplicate the template as a new image. Close the original. **Increase the canvas size by going to image, canvas size then increase it to 600x600.
Open several papers of choice, resizing as needed. For example, when I look at the blue bar where it tells me what I’ve opened (say like paper 2) it tells me what percentage I’m viewing it at. For me it’s usually 16%, so I resize to 16% bringing it to 100%. ( I hope that made sense!) Once you’ve done this, minimize for later use.
Next go to the bottom template layer and go to selections, select all, then float, selections defloat. Add your gradient glow of choice. Don’t forget to go to selections, none then delete the template layer. Repeat this process for the rest of the template.
Add a new raster layer, flood fill with your choice of paper. Add your mask, and merge group. Move this layer to the bottom.
Open both the butterfly brad wires. Resize the first one as needed, copy and paste as a new layer, moving just above the circle layer. Arrange it over the circle as you like. Resize the other one, then copy and paste as a new layer, moving above the other one as you like. Note that I moved mine slightly higher.
Now we’re going to make our hospital scene window. Open the hospital bed, resize it, then copy and paste as a new layer. Move it so that its towards the bottom, right hand corner of the frame. Move it below the frame layer also. Using your magic wand tool, click inside the frame, got to selections, modify and expand by 6. Go to selections, invert, and on the bed layer hit the delete key. Add the eye chart after resizing, moving below the frame layer and to the upper right hand corner. Then open the bottle cap you like, resize it then copy and paste above the bed layer. Add a clipboard to the bed, and the IV drip to the left hand side of the bed.
Next open the Heart and with stat line of your choice. Copy and paste it then mirror it, moving it to the middle of the bottom portion of the frame. This should be the top layer.
Now open your tube of choice, copy and paste as a new layer to the right hand side of the tag.
Open the pill package, pill bottle, first aid kit and pill capsule. Resize then copy and paste as new layers to the bottom left hand side of the tag, grouped together as you like. Add the syringe to the bottom of the grouping.
Then open the rose corsage you like, resize it then copy and paste as a new layer to the left part of the tag. Move this layer below the grouping.
Open the HGH Nurse Id card, erasing the string part. Resize then copy and paste as a new layer angling to the left a bit. Move to the upper left hand corner as you like it. Add a clip of choice to the top of it.
Add any text, copyrights and tagger markings.
Save and your done!

No comments:
Post a Comment